
How to configure SAML in Oracle Service Bus (OSB) 12c
Published on: Author: Eduardo Barra Cordeiro Category: OracleHow do you configure SAML in Oracle Service Bus (OSB) 12c and trace your messages? I will show you how in this blog.
How do you trace issues?
- Context
During projects that require integration with service providers (usually third parties) it’s quite common to use security, authentication and/or message sign in the form of encryption to exchange messages between a trusted client and a trusted provider. In this post, I will describe how to configure and implement these within the Oracle Service Bus 12c. I will show you a few differences between OSB standards policies types, and how to trace them in the diagnostic server log. I am going to assume you have some experience in OSB, but not a lot in how to set up security.
- Prerequisites
Keep in mind that the scope of this blog will only cover a few parts on OSB level. Check what the requirements and the possible restrictions in your network are for your case. For example, a proxy and firewall configuration could need additional attention. Usually when there is a third party involved, you will need to whitelist your service provider endpoint to be able to connect. And your client must have done the same to receive your connection.
- Setup
In this post I used a pre-built standard 12.2.1 VM provided by Oracle, containing WebLogic, SOA Suite, OSB and JDeveloper. You can find it here.
1. Setup WebLogic to support SSL
Summary
Configuring WebLogic (WL) to support SSL will enable HTTPS port and security connections to your server.
How?
First of all, we need to create a custom identity JKS and custom trust JKS, and configure a self-signed certificate.
- Open a terminal to connect to your server box.
- Find the folder security in your server directory. If you’re using the suggested Oracle VM, go to < path in your domain directory for security artefacts; example: /u02/oracle/fmw/config/domains/soa_domain/security/
- Execute the commands below to create your keystore. It will generate the private/public keys (example: identity.jks file). You can change/adapt the name and password if needed. In this post, I will use the parameters below.
- This script will require some information from your company. Inform as needed. One of them will be Common Name. You should provide a domain/DNS/machine name. Usually in real production systems where we implement our own keystores, the CN should match your domain name.
- Now export the public key based on the identity just created. To do that, execute this line:
- The next step is to import your public certificate in your trust.jks file. It contains all trusted certificates in your WL server. You need to add all trusted certificates you are supposed to connect with to this file. Execute the following line:
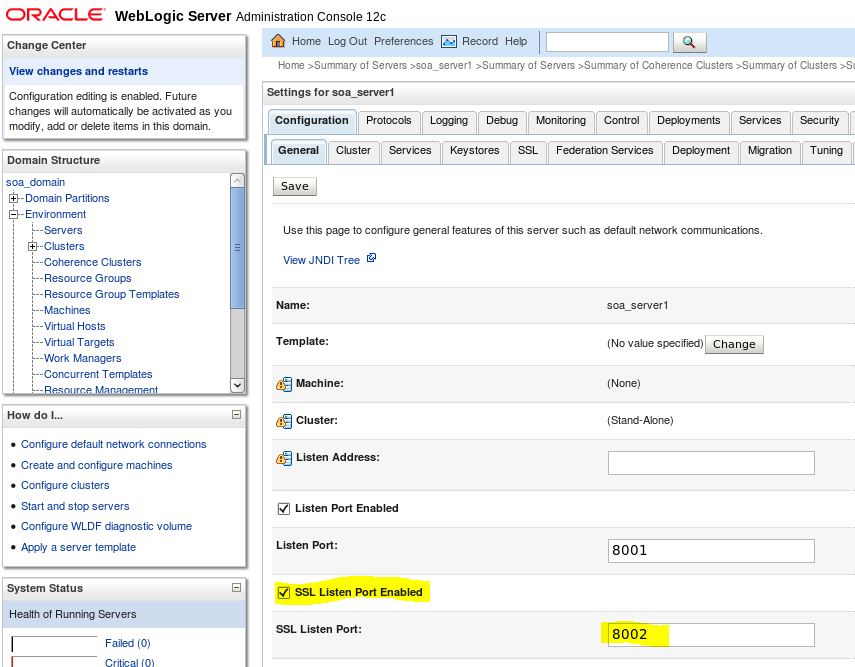
- Now open the WL console and go to the Server/Configuration/General tab of a managed server. Check if the SSL Listen Port is selected, then obtain the configured port.
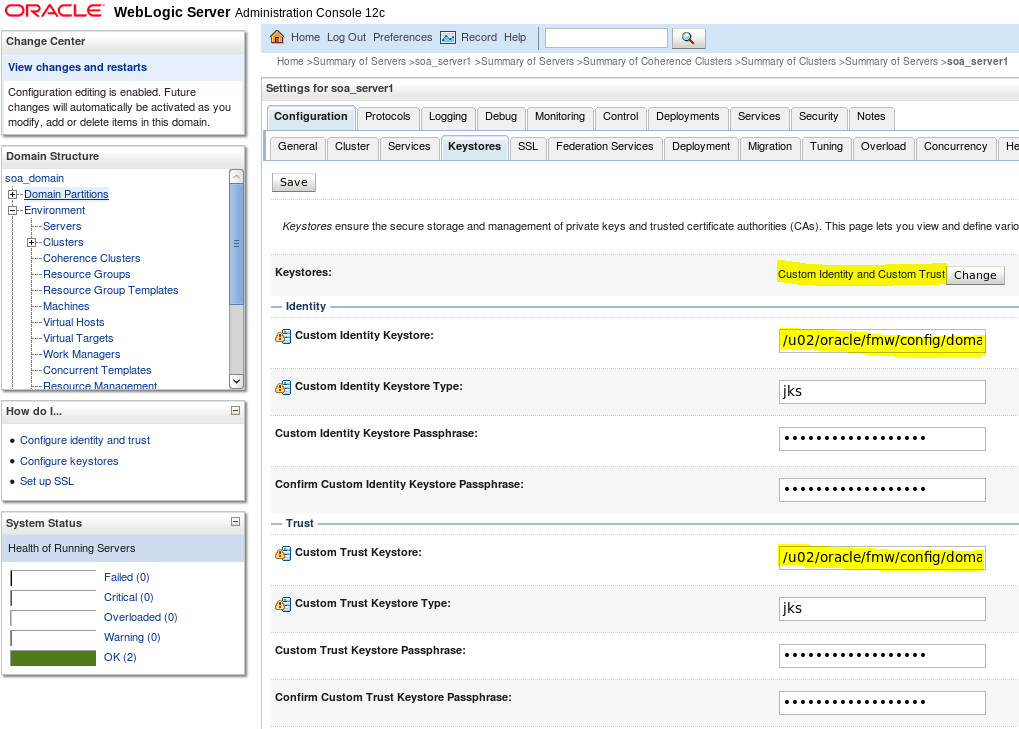
- Now move to the Keystores tab. In the first option, select Custom Identity and Custom Trust. We will set it up using the files we just created.
- You need to put in the path for identity.jks and trust.jks. And you need to put in the keystore type (JKS) and the password used in both keystores creation.
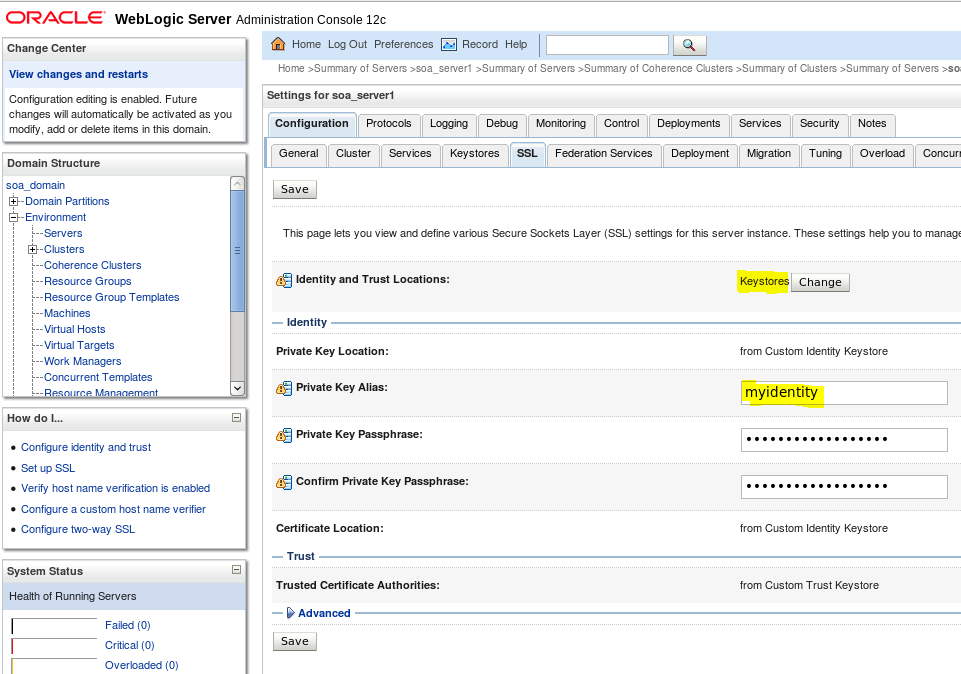
- Save the changes and move to the SSL tab. There, you will need to inform your private key alias and the password.
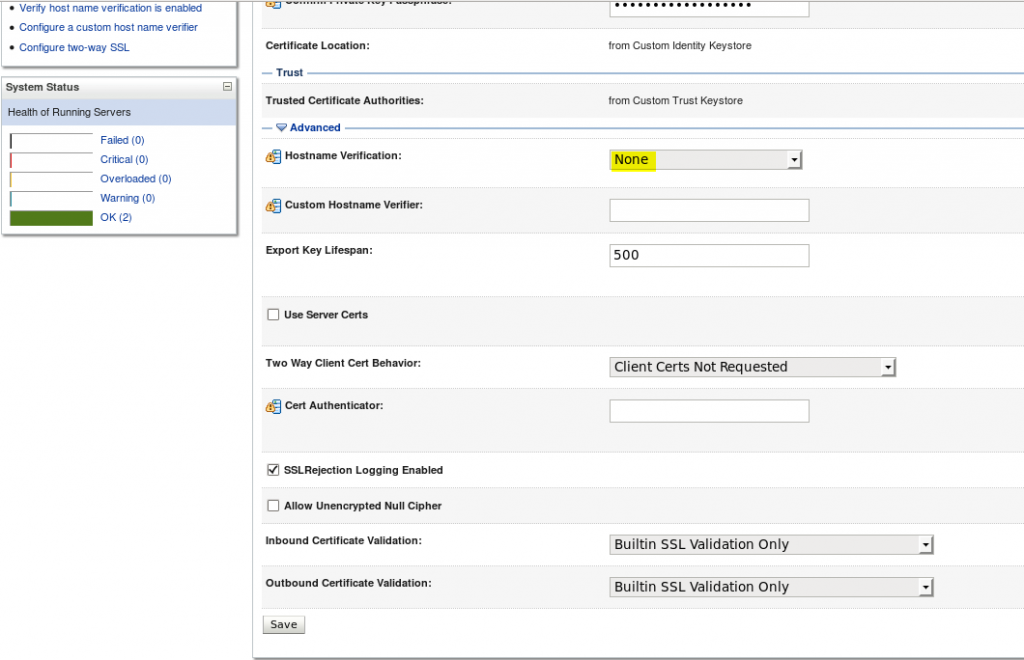
- Save the changes once again. In the same tab, click on Advanced. In Hostname Verification select the option None. We need to select this if the Common Name of the certificate isn’t the same as the hostname of the machine where WLS is installed.
- Save your changes.
- At this point, you will need to restart your server to apply the changes you implemented.
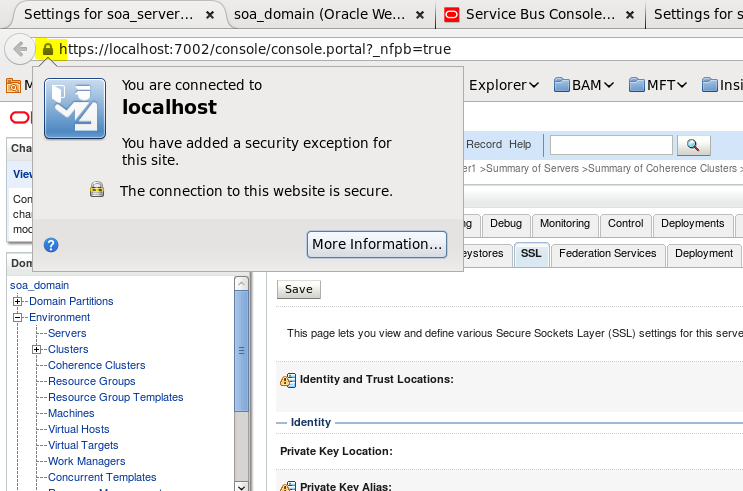
- When the server is back, you’re able to access your WL console using http or https. If you applied the changes correctly, both should work for you:
- In the https you will be able to see a lock:
- More details about this configuration, SSL and self-signed certificate creation are available in these articles: here and Doc ID 1109753.1
- Be aware that in many organizations self-signed certificates are only used for test purposes and not allowed in production environments.
2. Configure OWSM security
Summary
The next step is to set up the credentials that will be used in SOA and OSB context. The keys will be used together with the policies set in the code.
How?
We will use the EM to create the credentials and map them on the WL domain.
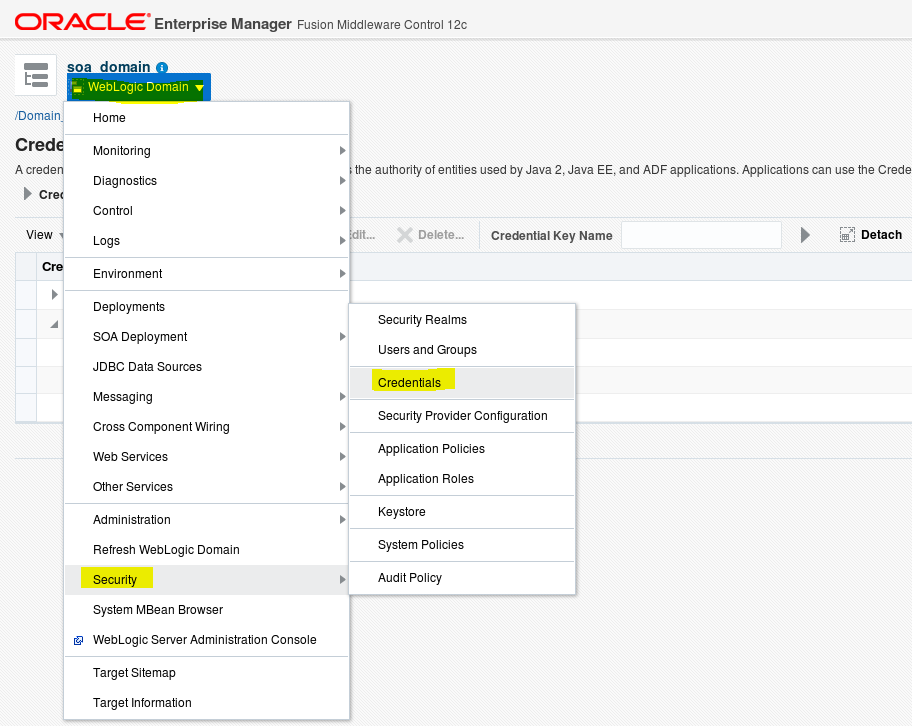
- Open the Fusion Middleware console (EM). Locate your SOA domain, Security, Credentials.
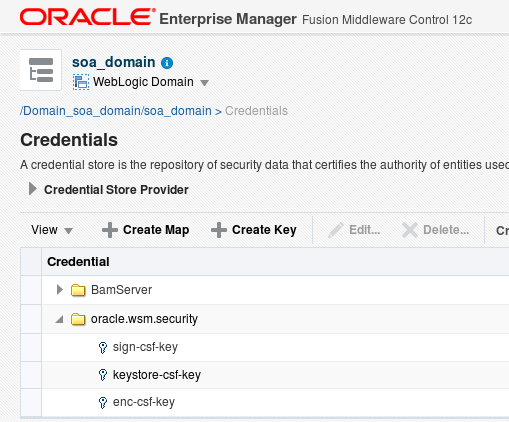
- We will now create 3 keys (as you can see below). Use your private key alias for each one (the one you used previously) and the password (that will be myidentity/identity1234 if you're following these instructions). Each one will be used for a different action. In this sample we are using the same private key in all of them. Consider using different certificates for signature and encryption.
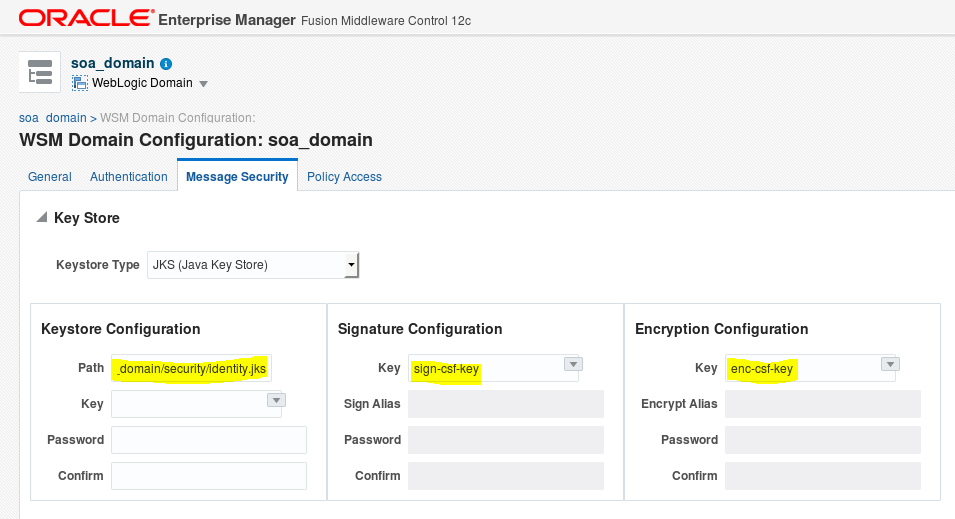
- Now go to Webservices, WSM Domain Configuration. There, we will configure the credential keys you just created.
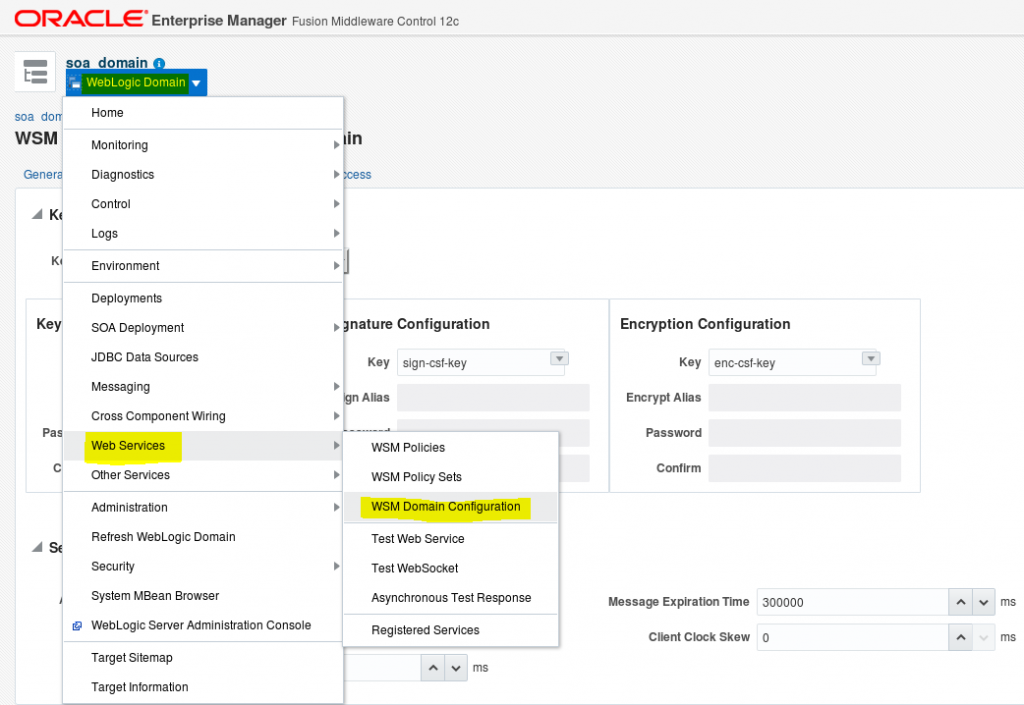
- In Keystore Configuration/Path set the identity.jks path.
- In Signature Configuration select the key you just created for this context.
- In Encryption Configuration select the key you just created for this context.
- Save the changes.
3. Deploy the test code
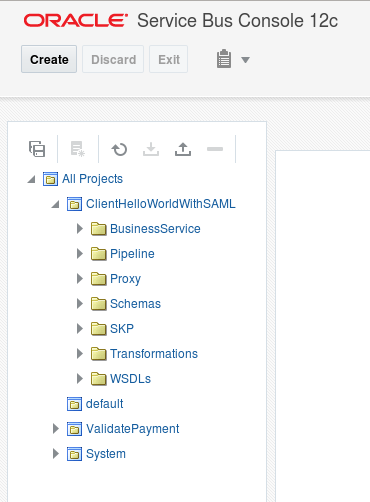
- Click on the red button below to download a ZIP file with the HelloWorld projects that I created for this example. It's a quite simple usecase: one BPEL composite with policy defined (service provider) and one OSB project that will call the BPEL project (client) with the same police configured. We will simulate some scenarios to validate different OSB standard policies, starting with wss10_saml_token_with_message_protection.
4. Enabling OSB log tracing for troubleshooting proposal
Summary
Before proceeding with policy validation, I will show you how to enable the trace in OSB 12c. On code level we are already able to include log activities in pipelines. But on server level, we can enable the tracing for business services as well. This is important for debug and troubleshooting. OSB provides a good feature to show how the exact message is generated, including the security header, when a business service calls a service provider.
How?
Follow the steps below to enable the tracing:
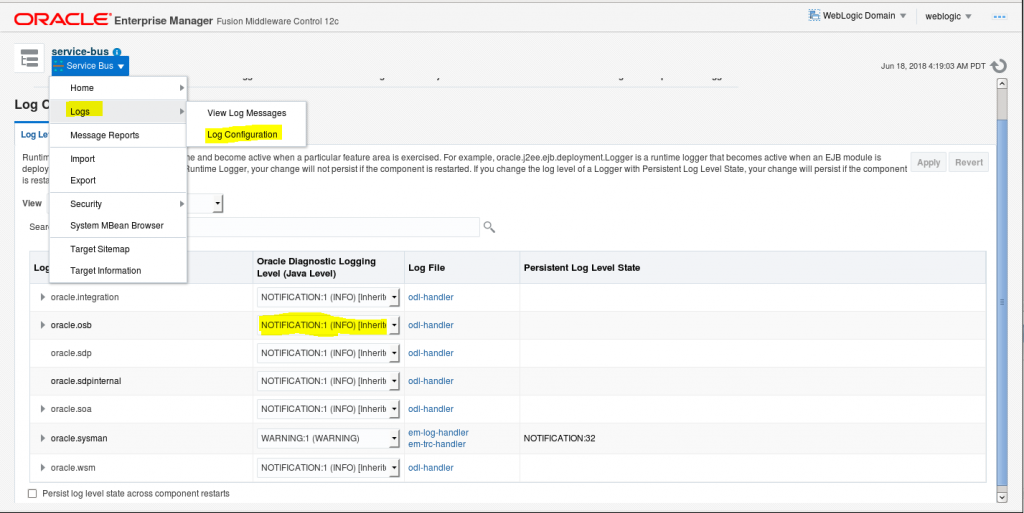
- In the Fusion Middleware console (EM) open the ServiceBus console.

- Check what the current OSB diagnostics log level is. You will need to set it to “Notification” to have the proper level of information logged. By default, oracle.osb is set to “Warning”.
- Now go back to the ServiceBus dashboard. Click on “Operations”. Then, click on search to show all your projects.
- On this page, you will see all the activities that can be traced. Select in Message Tracing column which operations you want to trace, then click apply.
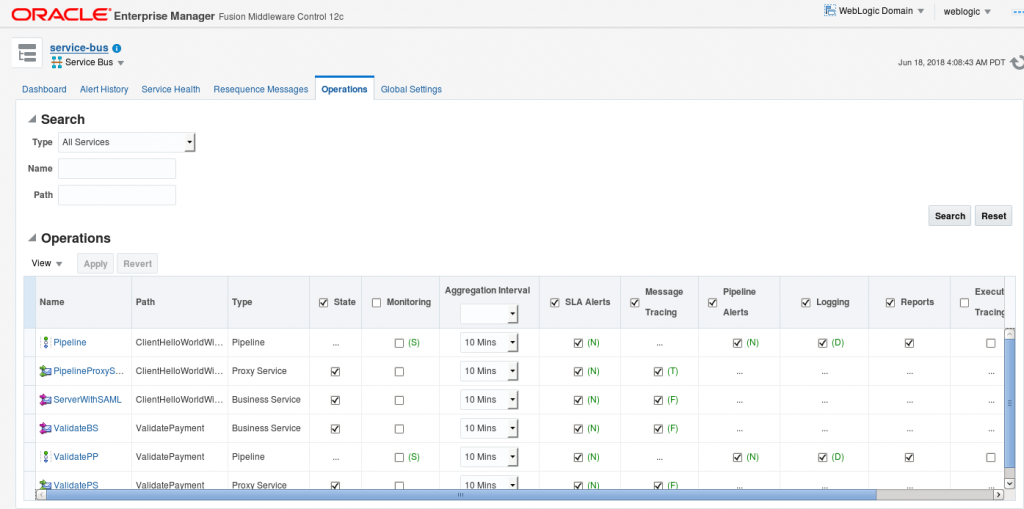
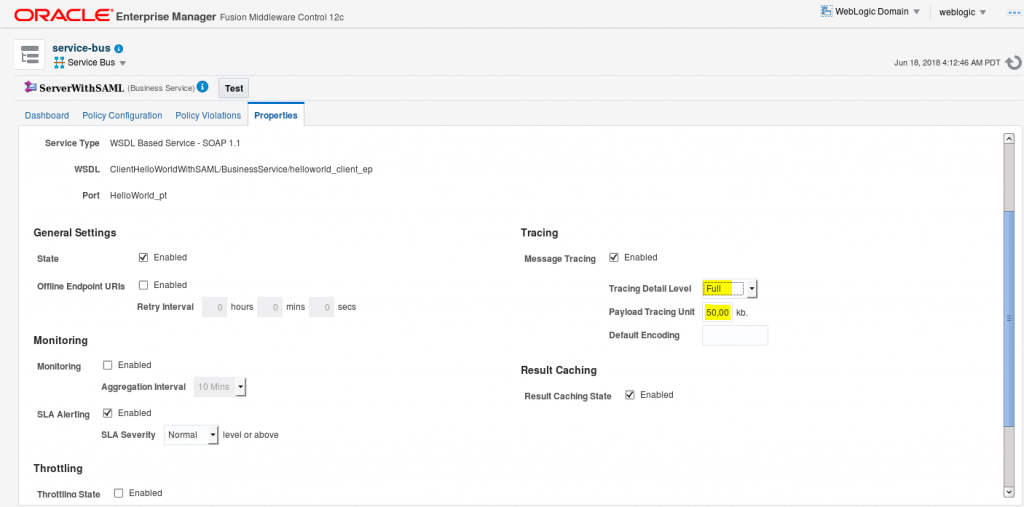
- For each object you will have a different trace level. By default, OSB sets it to Terse. But this isn’t enough if you want to show all the traces in the diagnostic log file. Select Full instead.
- Also, keep in mind that the default size of 8,192kb is too small if you are planning to use encryption. It’s wise to set it over 30,000kb. Otherwise your messages will appear cut in the log.
- Those are the needed steps to start seeing your end-to-end flow logged in diagnostic.log. Remember to disable the trace when you are done with your debug and/or troubleshooting.
5. Policy validation
Summary
In this step we will use a different kind of standard policy, provided by OSB, and look at different setups and results.
How?
First, be sure you deployed the code available in session 4. After deployment we will update the policy using the EM and ServiceBus consoles. Follow the steps below:
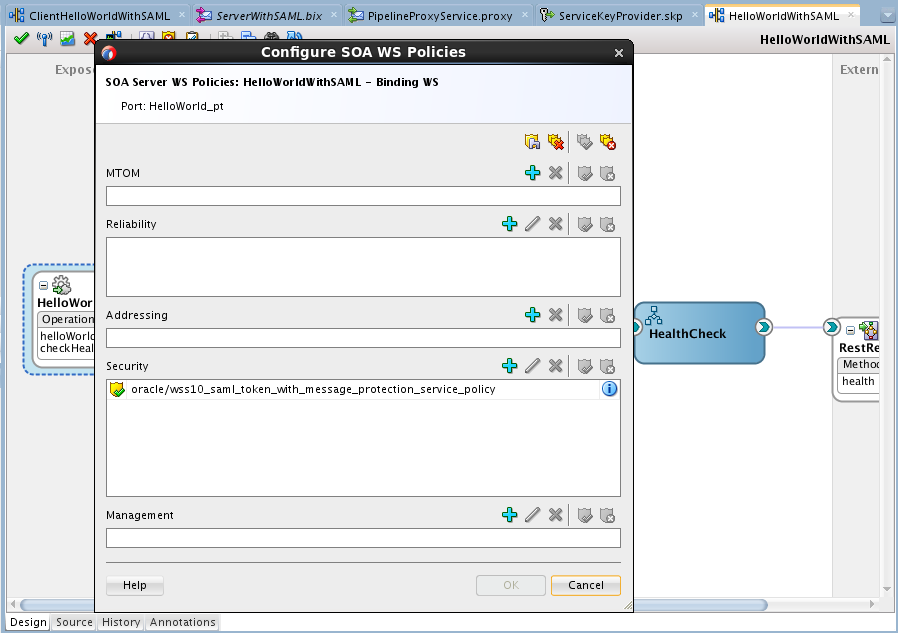
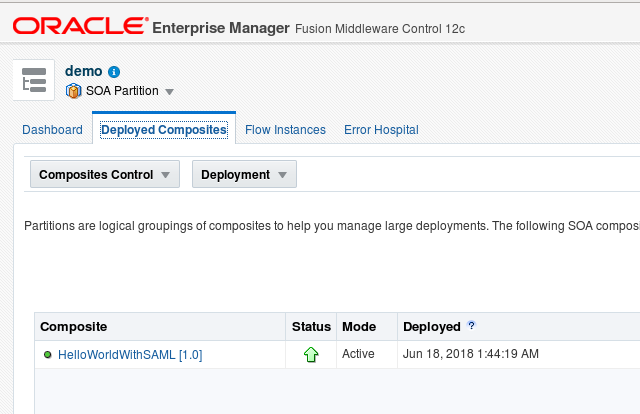
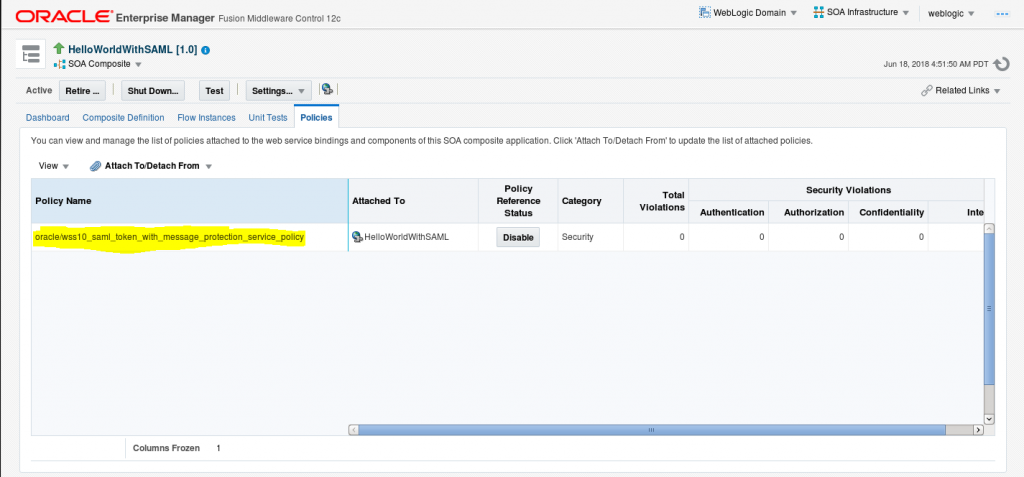
- Check if you already have your code deployed (BPEL and OSB).
- Check if you have the service policy in BPEL project set to: wss10_saml_token_with_message_protection_service_policy
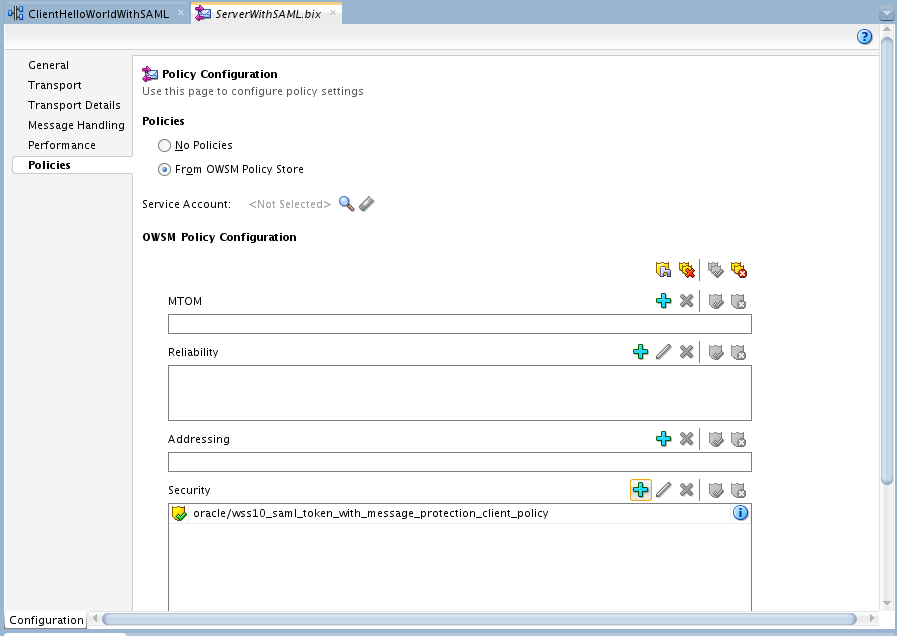
- Now check if you have the correspondent client policy set in your client OSB:
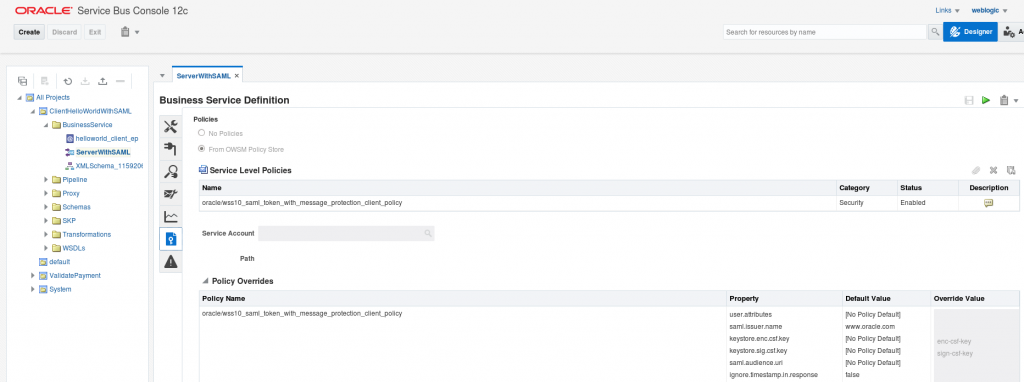
- In this case, we are using the following parameters to set the client policy. Each policy will require different mandatory information, based on what kind of envelope will be generated. In this example we will sign, encrypt, and authenticate:
- keystore.enc.csf.key: enc-csf-key
- keystore.sig.csf.key: sign-csf-key
- csf-key: keystore-csf-key
- keystore.recipient.alias: myidentity
- Configure your client service in SOAP and drop a new request.
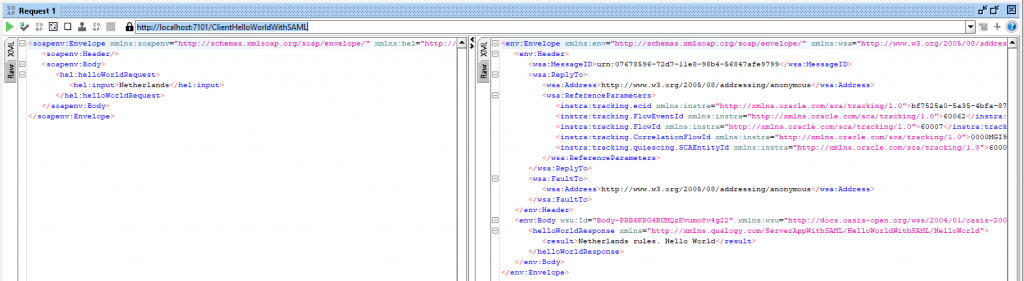
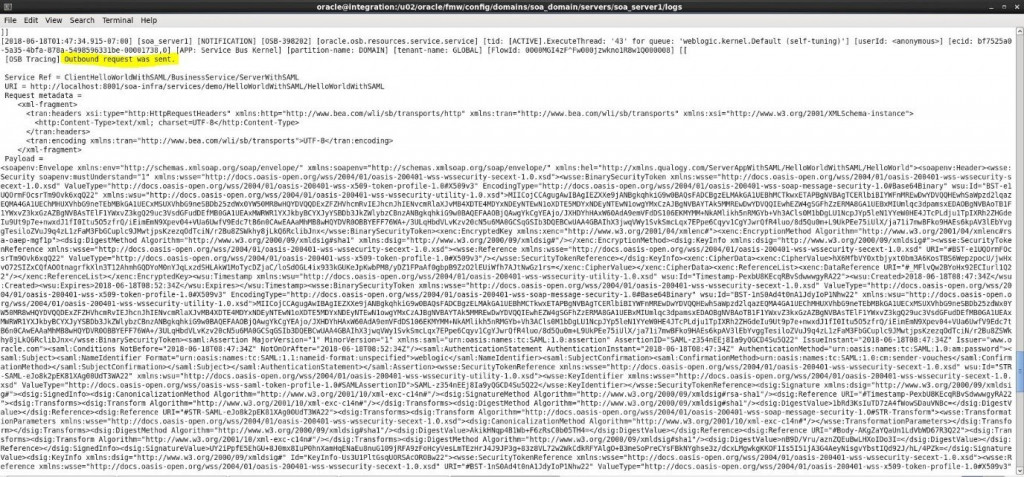
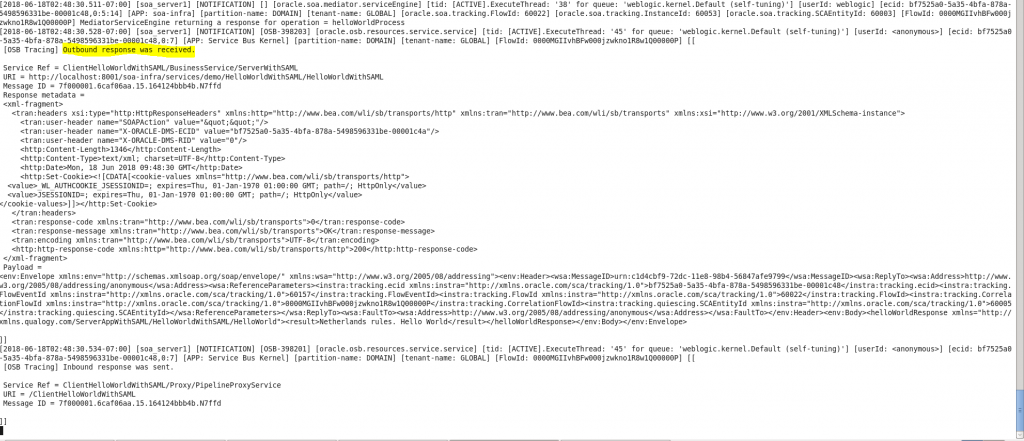
- If you followed the step before (4 Enabling OSB log tracing for troubleshooting proposal) you’ll be able to see in diagnostic.log server log the payload generated, with all required header information in client side. Also, you will see your body encrypted.
- Besides, you have received the response from your service provider, including all required information as well as an encrypted body.
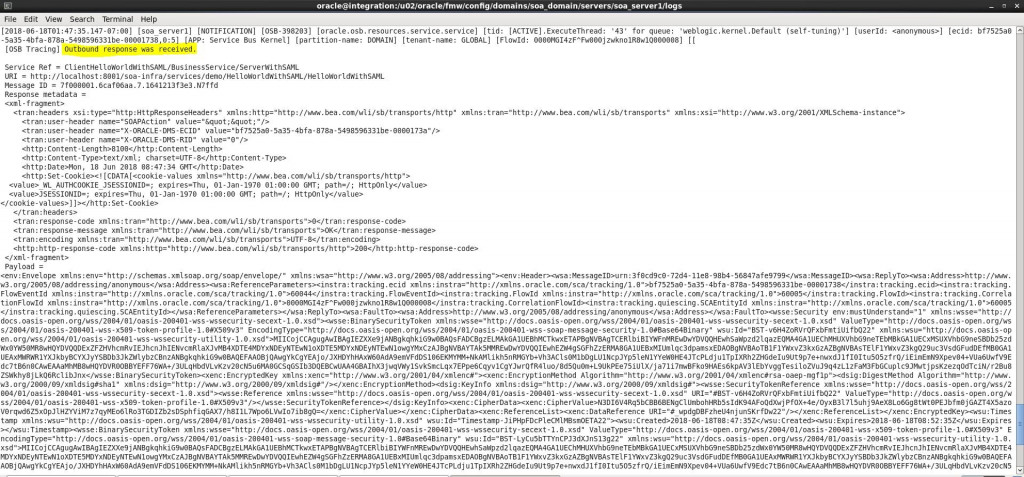
- Click on the red button below to download the two xmls with a sample message generated for request and response.
- Now, we will change the policy and see different results in the log.
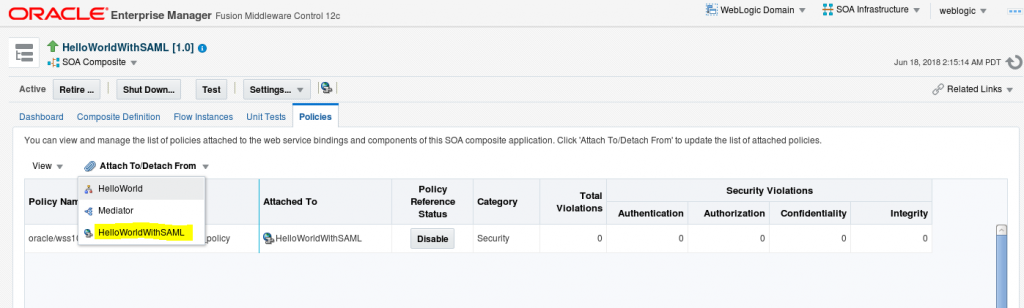
- Let’s start with changing the service provider policy. Go to EM and open the BPEL project in the policy tab.
- Click in Attach to/Detach from and select HelloWorldWithSAML
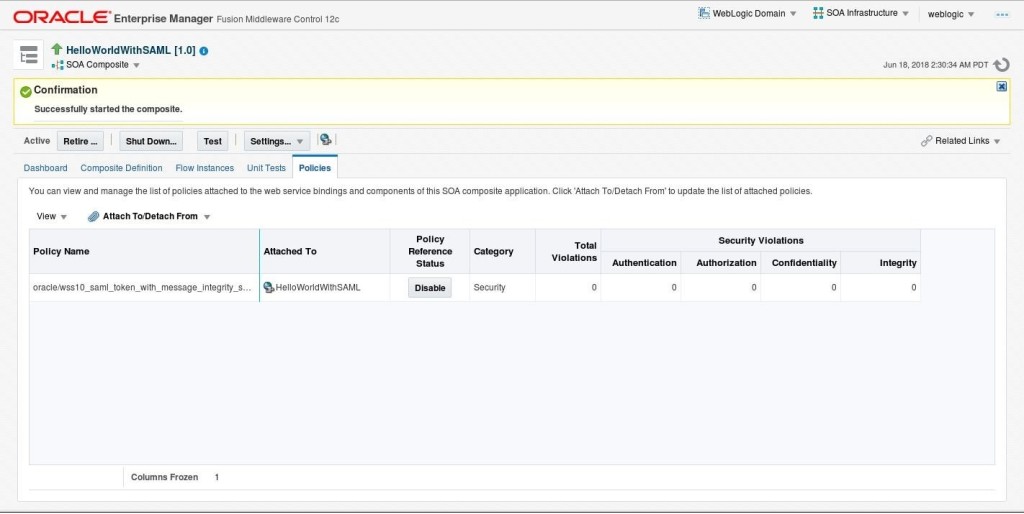
- Select wss10_saml_token_with_message_integrity_service_policy and click Attach.
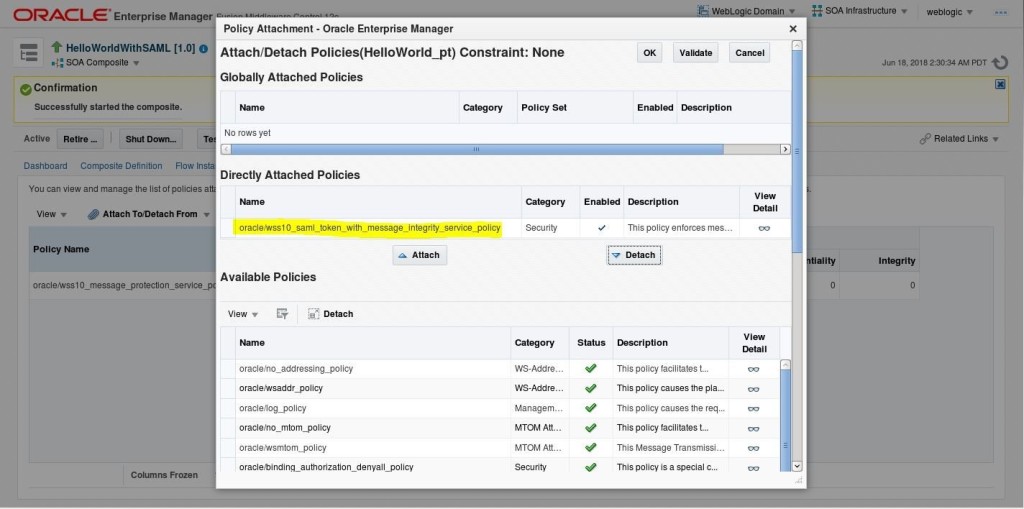
- Select the previous policy and click Detach. Click OK.
- Before changing the client side, test the same request while using SOAPUI. You should receive an error:
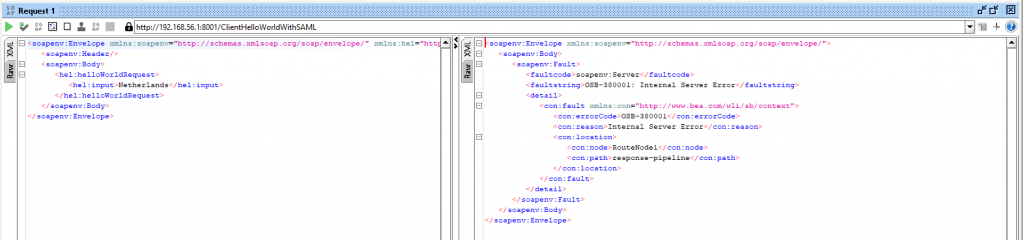
- In this example, I am not using error handling at OSB code level. You can see the reason for this error in the log:
- NOTE: checking the logs is always a good way to understand your error messages.
- Now let’s change the client side and check again.
- Open the ServiceBus console, create a new session and locate the ServerWithSAML Business Service that will be updated with the correct policy: wss10_saml_token_with_message_integrity_client_policy
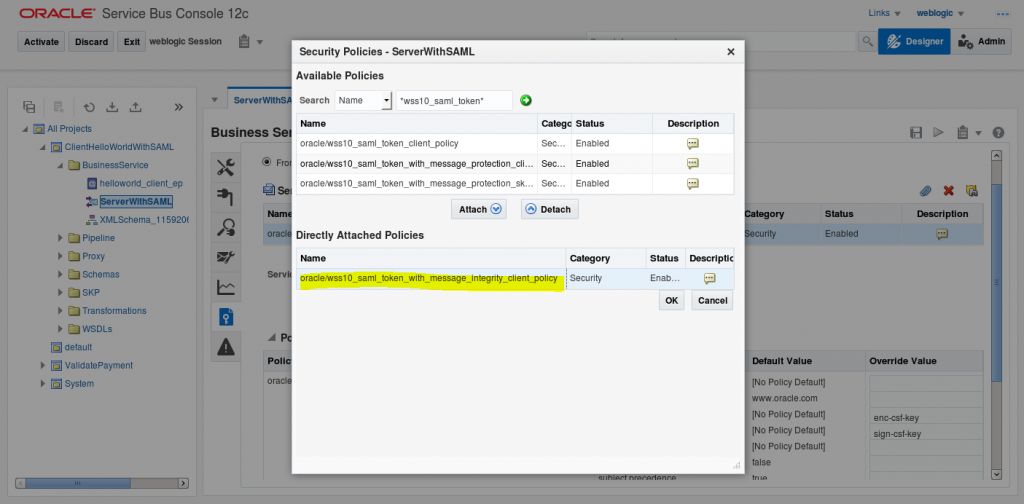
- The mandatory parameters for this policy will be different, since they are not required for this encryption:
- keystore.sig.csf.key: sign-csf-key
- csf-key: keystore-csf-key
- Activate the session and try a new request using SOAPUI project. It should work fine now.
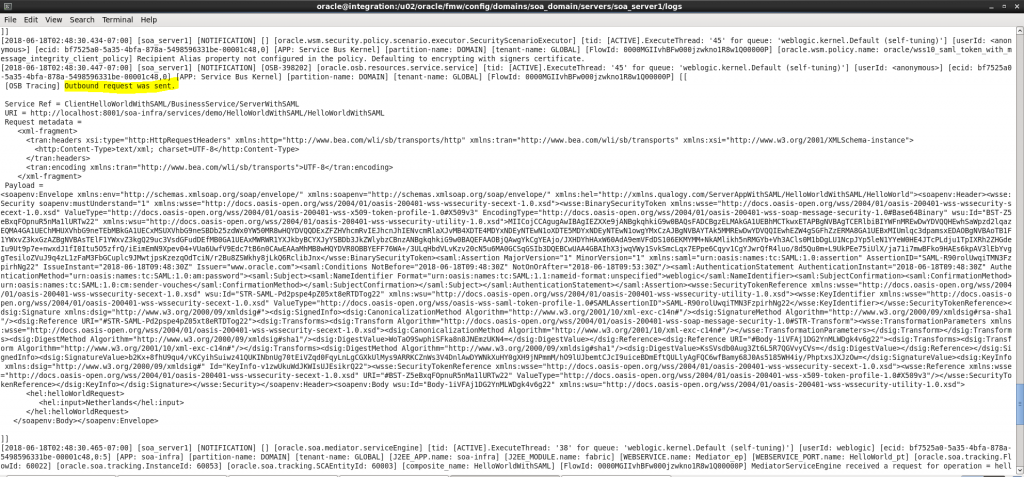
- Now let’s see what has been generated in the diagnostic.log file. This is the outbound message sent from OSB client to BPEL:
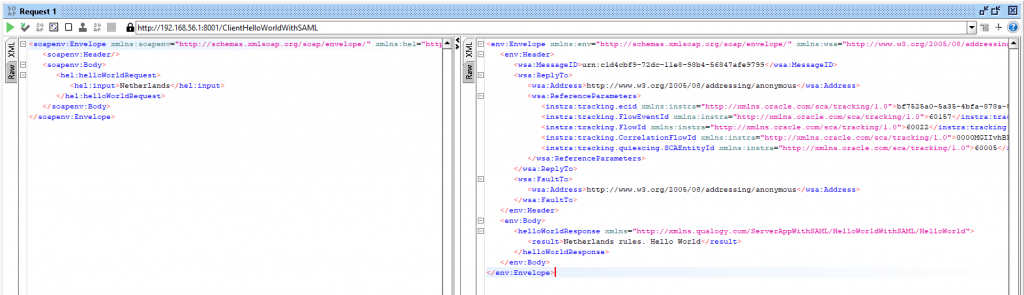
- And here we can see the response:
- Note that the body this time is not encrypted. And the response header is much simpler.
- Depending on the requirements, you can use different policies. Including tokens. Oracle provides a lot of information about this. You can see the different scenarios in the articles below:
- It's not common, but you might need a customized policy to adapt the service provider requirements. Read more here: https://docs.oracle.com/cd/E28280_01/admin.1111/e15867/policies.htm#OSBAG933
Conclusion
- Securing your webservices is usually a requirement for customers.
- The standard OSB policies will help you implement exactly what you need.
- In case your service provider does not use OSB or OSB policy standards, you will need to customize yours.
- Using the log tracing, you’ll be able to know what message has been sent, in case you need to troubleshoot the transaction.


Muy bueno tu post, muy útil para iniciar y entender. Muchas gracias!
Very good your post, very useful to start and understand. Thank you!
Muchas gracias, Rafael
In the first screenshot for section 3, I see that the HelloWorld component in the server project seems to be hooked to a REST service. All I can read in the image is "RestRe".
Not sure if that is the problem, but when I download the code I don't see that rest service in the composite. It just stops at the HelloWorld BPEL process component. Then...when I run it, I get a <faultstring>OSB-380002: Not Found</faultstring>
Still...the information has gotten me a long way toward using SAML in OSB.
Espectacular explicación espero seguir los pasos correctamente