
Customizing Mobile Timecards for Oracle EBS (part 1)
Published on: Author: Richard Velden Category: OracleHow to customize Oracle’s Mobile Timecard app for Oracle E-Business Suite (EBS)? You'll find out in this tutorial. In this first part we will focus on setting up the development environment and performing the initial setup for enabling customized apps in Oracle EBS.
Oracle’s Mobile Timecard app for Oracle E-Business has been developed using Oracle Mobile Application Framework (MAF). Oracle offers customers the capability to customize this application for their needs.
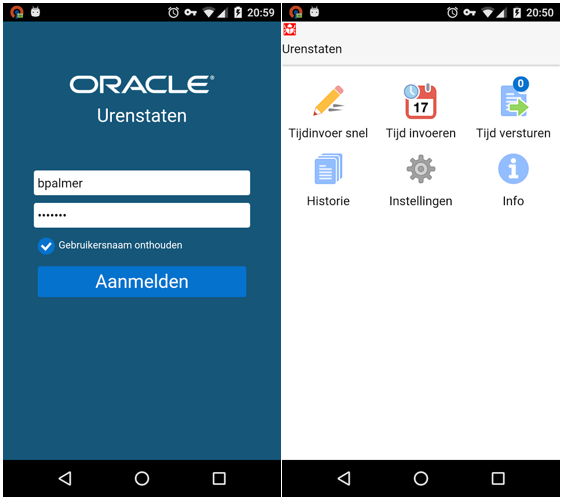
![Figure 1: EBS Timecards mobile application [2]](/static/upload/lightbox/68425515-e8c7-a6de-a222-52d6a13c07cf/1.png)
Why customize?
Oracle provides a great new app, at no additional cost. Oracle will even provide support and updates for these apps. Just download any updates from your Google Play or App Store and you’re ready for business. So why customize?
For one, unlike ordinary consumer apps, business apps should support the business. And they connect with a particular business backend system (Oracle EBS). An update from the Google Play or App Store might for instance give mobile users additional access or information, which might not be desirable for the business. In general, to prevent any kind of surprise, companies like to be in control of software version changes.
Another reason is to enable a company to apply corporate branding. Oracle supports this in a minimalistic way, by enabling us to change the logos / privacy policy, etc. Making any more intrusive changes to Oracle’s seeded mobile apps is not supported (yet).
To give an impression on what we may, or may not customize, we will step-by-step show how to customize Oracle’s Mobile Timecard App for EBS.
Overview
In the following chapters we will show how to create a custom Mobile Timecard App for Oracle E-Business Suite:
- Configure development tools
- Download Timecard App from Oracle E-Delivery
- Create Custom Timecard App version
- Register ‘new’ mobile app in Oracle EBS
- Deploy Custom Timecards App
Configure Development Tools
For modifying Mobile Timecards for EBS we need the following tools installed:
- JDeveloper 12.1.3 Studio Edition
Click here
- Oracle Mobile Application Framework 2.2.2
- Either use My Oracle Support patch 22697571
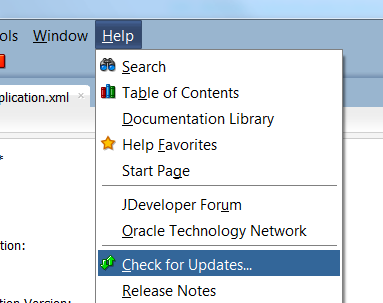
- Or use the ‘Help -> check for Updates’ in JDeveloper to acquire the MAF (2.2.2) plugin
- Android SDK (no need for Studio edition)
- JDK 8
For the complete configuration of these tools you can also check this site for more details. A little summary of these steps are described below.
Setup Android SDK
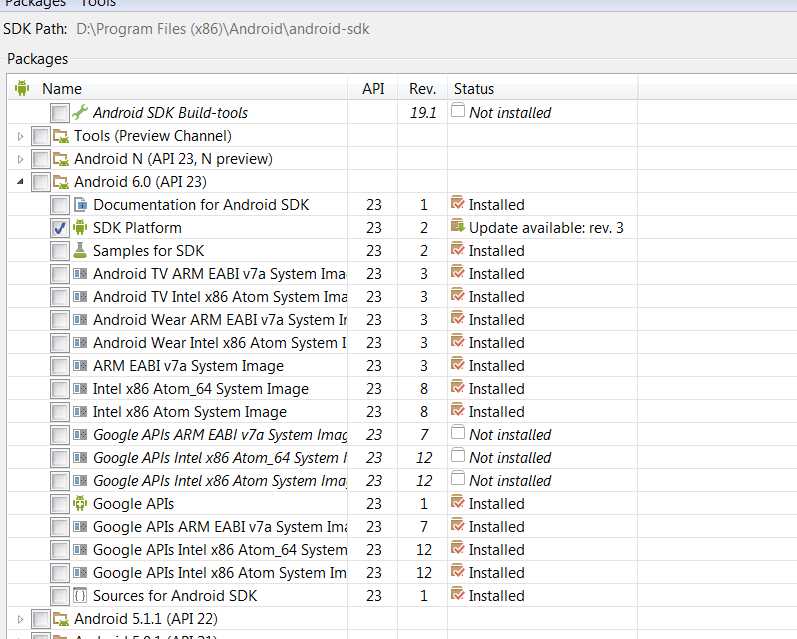
After installing the Android SDK, use the SDK Manager to acquire at least the following components:
- Tools
- Android SDK Tools
- Android SDK Platform Tools
- Android SDK Build Tools
- Extras:
- Android Support Library
- Google Repository
- Google USB Driver
- Intel x86 Emulator Accelerator HAXM
In addition choose an Android API version of at least 4.0.3 (API level 15). We chose to use API version 23 (Android 6.0).
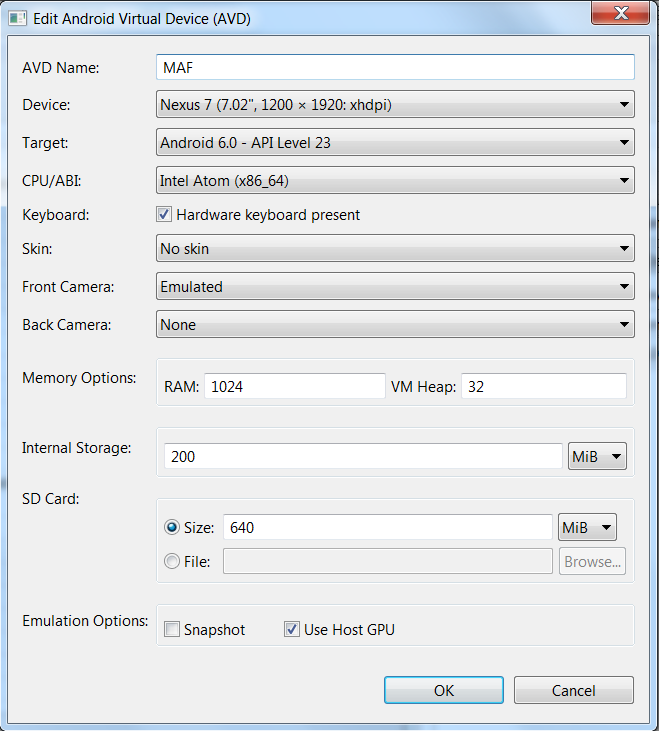
Create Emulator
Start the Android AVD Manager and create a new Android Virtual Device (AVD) as depicted below.
Setup JDeveloper
To use MAF, apart from downloading the extension you need to configure which Android SDK to use.
Navigate to Tools -> Preferences and expand the ‘Mobile Applications Framework’ node.
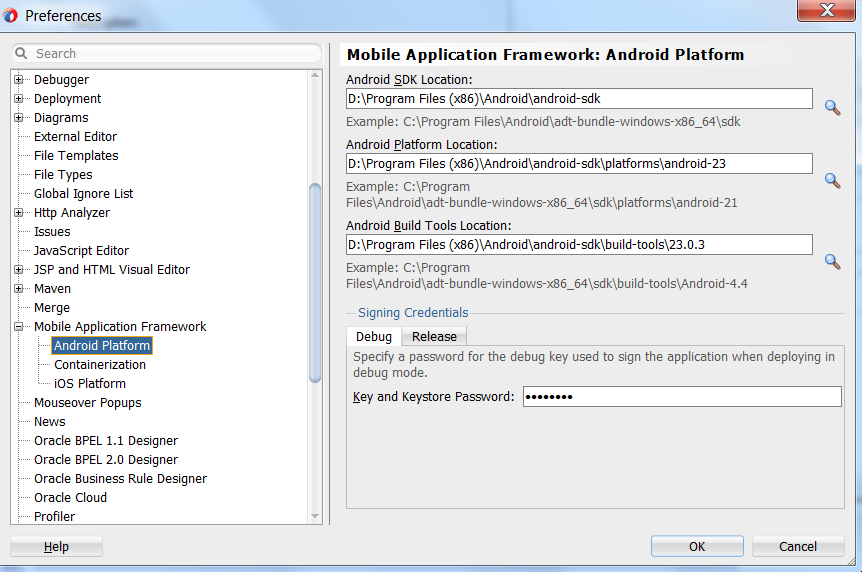
Here you can configure JDeveloper with the proper locations where you have installed the Android SDK.
Here you can configure JDeveloper with the proper locations where you have installed the Android SDK.
Download Timecard App from Oracle E-Delivery
Oracle offers the mobile app downloads from E-Delivery:
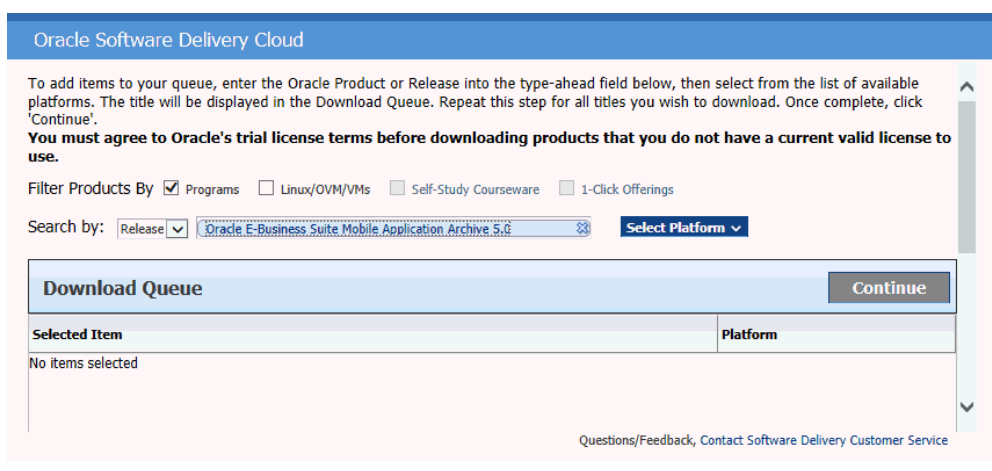
- Log in to the Oracle Software Delivery Cloud
- Sign in
- On page ‘Oracle Service Delivery Cloud’
- Check ‘programs’
- Search by release
- In the text field enter: “Oracle E-Business Suite Mobile Application Archive 5.0”
- Download both zip-files
Be aware: this is a pretty big download: >5GB
Now, unzip both files and check folder: EBS-Mobile-5.0
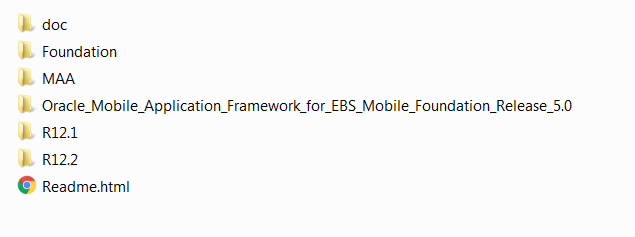
Documentation and archives
It contains documentation, the mobile foundation apps, the MAA archives, and the JDeveloper MAF plugin. The two other folders (R12.1 and R12.2) contain the EBS patches needed for enabling the mobile apps.
Open the MAA/software folder and extract zip-file p22680117_R12_GENERIC.zip to obtain the Timecards app. The timecards app itself (Timecards_Archive.maa) is not that big, just a few MB.
Open MAA Archive in Oracle JDeveloper
Now we open the Mobile Application Archive (MAA) in Oracle JDeveloper. Go to: File -> Import and choose to import a MAF Application from Archive File.

Use the browse button to look up the Timecards_Archive.maa just extracted.
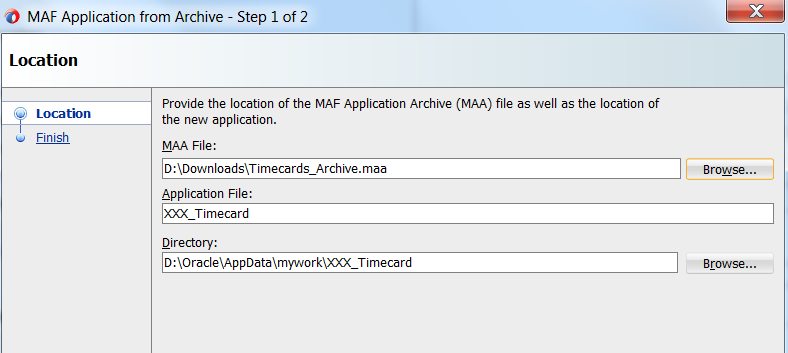
As application file you can choose a name. We chose a name derived from the original Timecard app: ‘XXX_Timecard’. Choose a folder in which you would store the custom Timecard application and press 'finish'. You’re custom copy of the Timecards app is ready for modification.
Create Custom Timecard app version
Our first version will not contain any real modifications. The only modification is to discern this version from Oracle’s original Timecard app. So no changes, just ensuring this particular version is the one deployed on corporate devices. For this we need to change the application ID, and register this new mobile application in Oracle E-Business Suite.
Modifications to the application sources are heavily restricted by Oracle. For many modifications please check the ‘Application Resources’ on the left side of the UI. Expand the Descriptors/ADF META-INF node as depicted below.
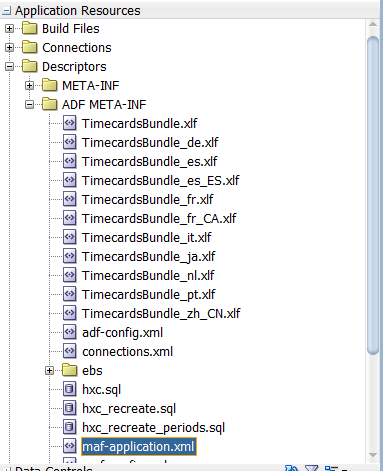
Now open the file maf-application.xml which can be found under Application Resources -> Descriptors/ADF META-INF.
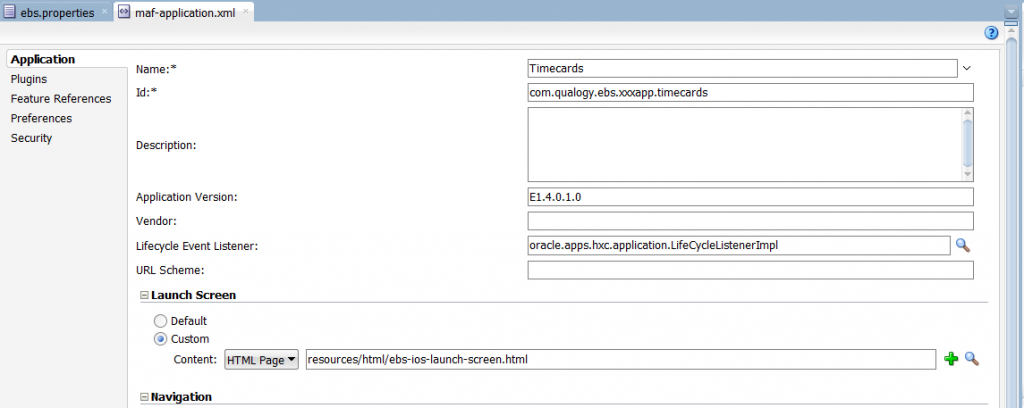
Now: modify
Modify the application bundle ID to use your company name (e.g. com.qualogy.ebs.xxxapp.timecards). Make sure to write this down, because we need it when registering this ‘new’ app in Oracle E-Business Suite. The next field eligible for change is the application version. The E in the version indicates it has been created from a MAA file. To keep track of which original version you have modified Oracle suggests to keep the first parts of the version, and optionally mark your version numberings at the end (E1.4.0.x.x, such that our 1.0 version will become E1.4.0.1.0).
Register ‘new’ mobile app in Oracle EBS
Once we’ve defined our new Application ID in JDeveloper, we need to register this in Oracle EBS as well.
Login as SYSADMIN (or other user with the Mobile Applications Manager responsibility). Go to Responsibility: Mobile Applications Manager and click “Register Application”
Just fill in some application short name, and an application name, but make sure to use the ‘Application Bundle ID’ as defined in JDeveloper (com.qualogy.ebs.xxxapp.timecards)
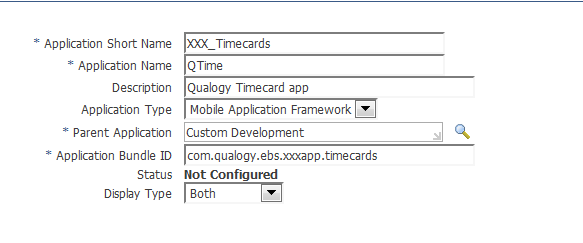
The service version must be the same as defined in the original Timecards app from Oracle. Please make sure to look up this version first. It can easily be found in the Mobile Applications Manager as well. For our version of the Timecards app this was Service Version 1.0.0.

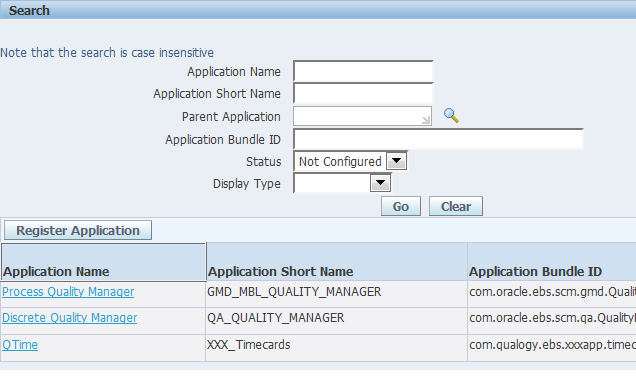
On the next configuration page keep all settings default, click 'next' and then 'finish'. The application has now been defined, next step is to configure it for use. Search for our new application, either by name or by checking all ‘not configured’ apps.
To set the app to ‘enabled’, click on configuration and set the status to: enabled.
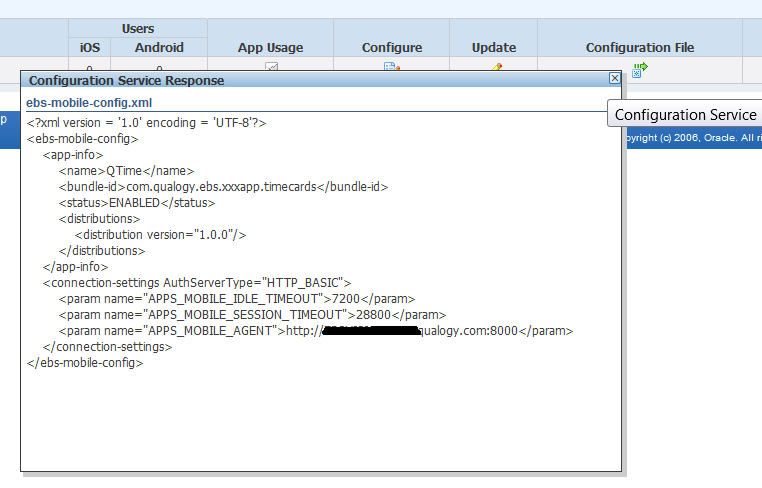
Finally check the configuration by clicking the Configuration File link. This is the first file your mobile app will retrieve before showing the user login screen. It contains the confirmation that this particular mobile app has been properly enabled on this environment.
Now we should be ready to deploy and run our new custom mobile application. Just to check whether we have a user who is allowed to run the app, we need to ensure this user has the proper UMX role in E-Business Suite.
Because we have already set-up user BPALMER in a previous blog we do not need to do anything.
By default the custom mobile app requires the same UMX role as the regular app. Thus this custom version will also work for user BPALMER. However, if you would like to regulate access to you custom Timecard app separately, you can modify the rolecode in the ebs.properties file located under: Application Resources -> Descriptors/ADF META-INF/ebs

For this tutorial we will use the same role as used by the original Timecard app. The ebs.properties file offers developers some options to do supported customizations to the timecard app. For now we’ll leave it alone.
Deploy Custom Timecards App
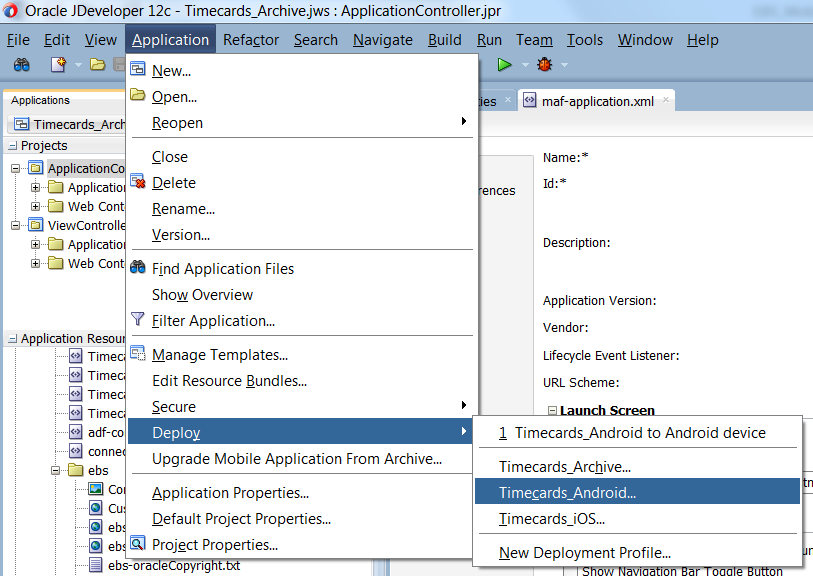
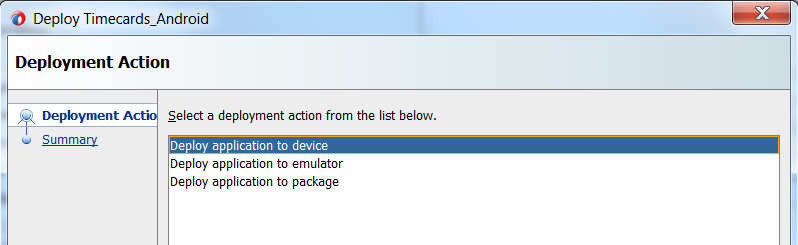
Making no further real changes, we will try to deploy this ‘custom’ version onto our device (or emulator). Just select deploy from the Application menu, and select the Android deployment profile. Choose to deploy to device or emulator in the next screen.
If deploying to an emulator, please make sure it has already started. The emulator can be started from the AVD Manager application.
If deploying to device, make sure you’ve connected the Android device using an USB cable. For some devices you need to download separate Windows device drivers. You can use the android SDK manual to find out and troubleshoot how to connect to your mobile device. The first time connecting we needed to separately allow this type of connection on our device.
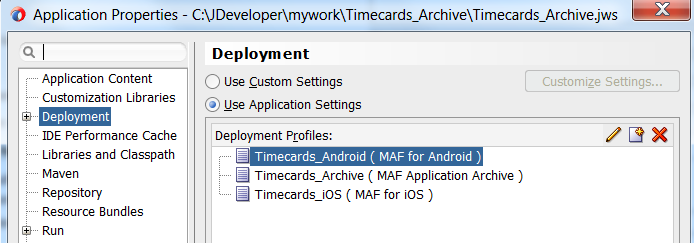
If deployment fails because of some keystore errors. Please open the Deployment Plan (Application Properties -> Deployment) and modify the deployment plan used.
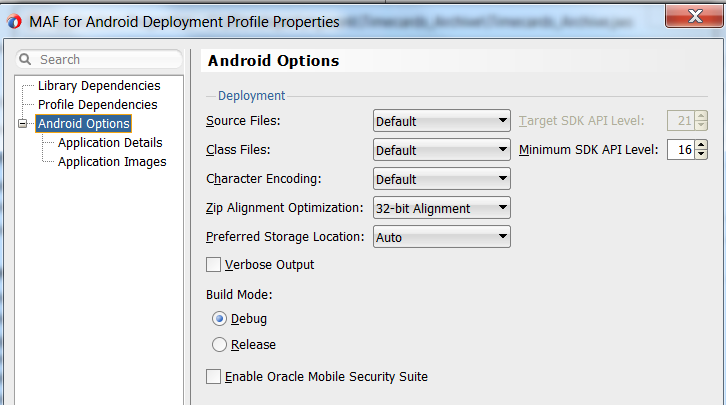
Click Android Options and check the ‘Debug’ radio button. To actually deploy in release mode, is not hard but beyond the scope of this tutorial.

Once deployment is completed open the app on device or emulator. The first time running the app you need to enter the URL of the EBS server.
After logging in as BPALMER (who we have set up earlier to use the seeded Timecard app) we now see our custom application. Please notice the red bug icon on the top left corner.
At the backend you can check the EBS Mobile Applications Manager. Here we now see our first (Android) user being registered in the backend.

Coming soon: perform customizations
Ok, we have now created our own custom version of the Oracle Timecards app. It enables us to have our own corporate version, which can be distributed centrally from within the company. The next step however, is to actually perform some customizations!
Coming soon!
References
[1] Oracle® E-Business Suite Mobile Foundation Developer's Guide
[3] Introduction to Oracle Mobile Application Framework
[4] Using Mobile Application Archives for Enterprise Distribution


