
Integrating Exalogic control with EM Cloud Control - Part 1
Gepubliceerd: Auteur: Jos Nijhoff Categorie: OracleA tale of two Enterprise Managers
This post is about Exalogic Control and Enterprise Manager Cloud Control, and how they can integrate and interact.
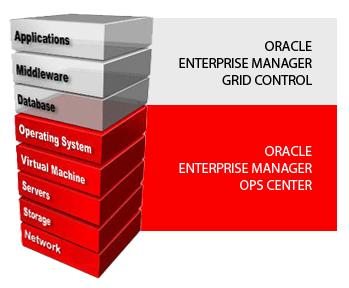
Enterprise Manager Ops Center (‘Exalogic Control’)
As the built-in ‘Infrastructure-as-a-Service (IaaS) dashboard’ for Exalogic, Exalogic Control provisions, manages, meters and monitors the complete virtual DC infrastructure for hosting your business software environments from the hardware up to the operating system level. Being an engineered system, an Exalogic has all required computing resources built-in : ZFS storage, Infiniband networking and 4-30 compute nodes bringing in lots of CPU and memory, ready to roll. Exalogic Control is based on Enterprise Manager Ops Center 12c, but it is much more than that. It is also tightly integrated with the Oracle Virtualization stack on the Exalogic.
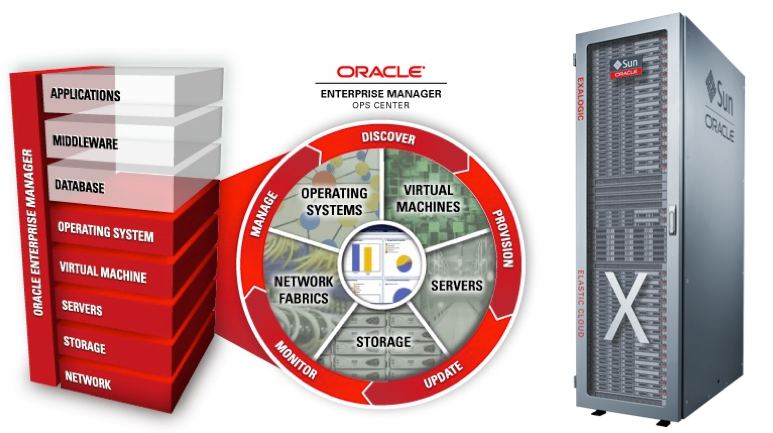
Enterprise Manager Cloud Control
The other Enterprise Manager, probably more familiar to most readers, is EM Cloud Control 12c. This is Oracle’s centralized solution for complete lifecycle management of your Oracle and third party business software solutions. It provides centralized monitoring, management, metering and provisioning (and many many more functions) of all software components from the operating system and upwards, i.e. databases, middleware, applications etc.
At the operating system, these two solutions meet up, as illustrated below :
EM integration question
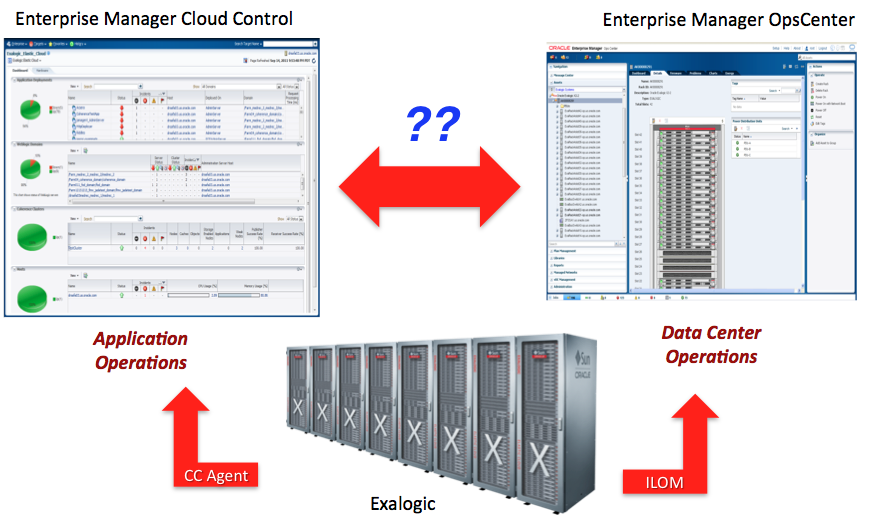
So, roughly speaking, Exalogic Control (EM Ops Center) is for datacenter operations and Cloud Control is for Business Application operations. A question I get frequently is how these two Enterprise Manager dashboards can interact and if they can be integrated. These dashboards serve two rather different work areas and therefore appeal to different ‘admin audiences’. Hence I have some reservations on the overall importance of such integrations, but they seem to raise considerable interest among coorporate customers.
Which integrations ?
Which integrations are possible? Digging through Oracle technical documentation I have come up with 4 integrations so far :
- Connect Ops Center to Cloud Control so ‘upper stack’ targets become visible in Ops Center
- Connect Cloud Control to Ops Center so ‘lower stack’ targets become visible in Cloud Control
- Integration of Exalogic ZFS storage management into Cloud Control
- Integration of Exacheck reports
The first integration has been adequately described by Gokhan Atil in this post, and is of somewhat less importance as most customers focus on centralizing and consolidating their IT management into Cloud Control. So, in this post I will focus on the second integration, which will make our Exalogic virtual datacenter visible in Enterprise Manager Cloud Control.
Connecting Cloud Control to Ops Center
Some prerequisites
I have found that for Exalogic the following conditions apply :
- You must be on Exalogic version 2.0.4.0.0 or higher (a.k.a. Navstar release)
- You must be on Cloud Control 12cR2 (v12.1.0.3)
- Virtualization plugin version 12.1.0.3 *
And of course we must make sure that all entities involved must be able to find each other on the network using their correct hostnames. This may seem obvious but it can really get you into trouble if you don’t check this every step of the way.
* version 12.1.0.4 of the plugin is also available now, but it appears to have some issues so it’s best not to upgrade it for now!
Steps to setup integration of the Exalogic vDC with Cloud Control
There are seven steps to make this integration operational :
- Install EM agent on the Enterprise Controller (EC1) vServer
- Install EM agent on the Oracle VM Manager (OVMM) vServer
- Deploy the Virtualization plugin on the OVMM agent
- Import Ops Center certificate into the Management Agent keystore
- Configure OVMM for read only access by Cloud Control
- Register the Oracle VM Manager with Enterprise Manager Cloud Control
- Discover the Exalogic system using Exalogic Elastic Cloud Discovery Wizard
Steps 1 and 2 : deploying the agents
As always, for Cloud Control to be able to operate something, it needs to have an agent in place. The deployment of the Cloud Control agents can be done in the classic way by pushing the agent to the target (see this previous post), or we can use the newly introduced oracle-agt package. This package is now present by default in the Exalogic virtual server base image (EGBT) starting from the Navstar release.
As we want to do this ‘the Exalogic way’, let’s take the oracle-agt option and deploy it on the OVMM virtual host as an example. Deployment on EC1 is analogous.
Update the agent.properties file:
Here we tell the agent where our Cloud Control instance is:
Then we let the oracle-agt package do the rest of the work:
Use the same procedure for setting up the agent on the Enterprise Controller vServer EC1. After this our EC1 and OVMM servers have been added to Cloud Control:
Step 3: Deploy the Virtualization plugin on the OVMM agent
Navigate to Setup > Extensibility > Plugins and deploy the virtualization plugin on the OVMM agent. If you need more guidance or background, check this link.
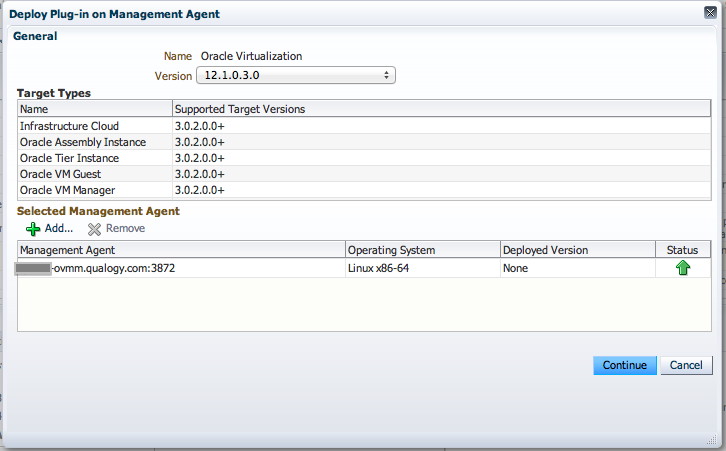
Here’s the result:
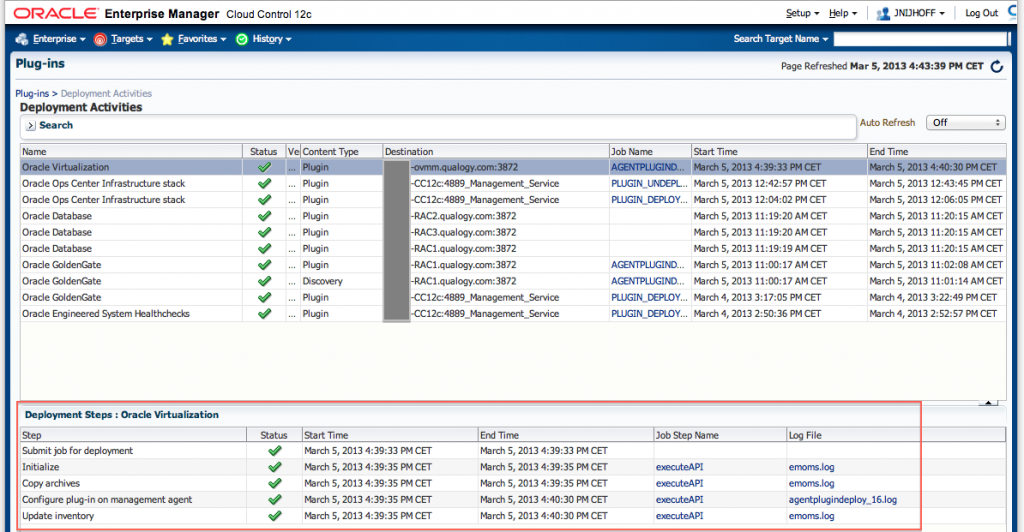
Now that our agents and the plugin are in place, we can get to the actual integration work.
Step 4: Import Ops Center certificate into the Management Agent keystore
We now need to get some authentication in place between Cloud Control and Ops Center. First we retrieve the Ops Center certificate, then we import it into the EC1 agent’s keystore.
Make sure you use the correct keytool version for this, or you will get arcane messages about ‘incorrect magic’, making you think you’ve logged onto some system at Hogwarts!
Import this key into the agent keystore:
Check the agent’s keystore:
OK, our certificate is in there (check the dates). To finish up, stop and restart the Cloud Control agent. Though the above import process seems to work OK, I found that the agent still complains about authentication when doing the Exalogic discovery in the last step. This issue can be solved by importing the key via the following alternative emctl command:
Step 5: Configure OVMM for read only access by Cloud Control
Next we setup the Oracle VM Manager for read only access by Cloud Control. This means that for now, you can only check and monitor the status of virtual servers in Cloud Control, but you will not be able to stop and start them (and do other changes). To get this done, we need the ID of our Exalogic rack. We can retreive this from any compute (hypervisor) node, from the em-context.info file:
Step 6 : Register the Oracle VM Manager with Enterprise Manager Cloud Control
Quoting the documentation:
The first step to register Oracle VM Manager is to authenticate to the Oracle Enterprise Manager 12c Cloud Control console. Once authenticated, click the Enterprise menu, then select Infrastructure Cloud,and click Home to access the Infrastructure Cloud page
This step is done from Cloud Control. Again, if you need more guidance or background, check this useful link.

After clicking on the Submit button on the top right, the registration job will be run.
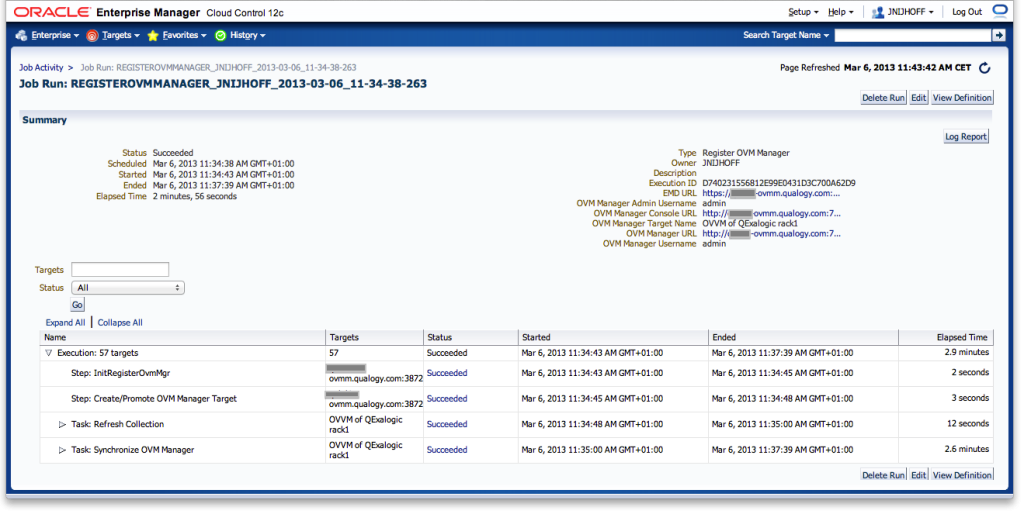
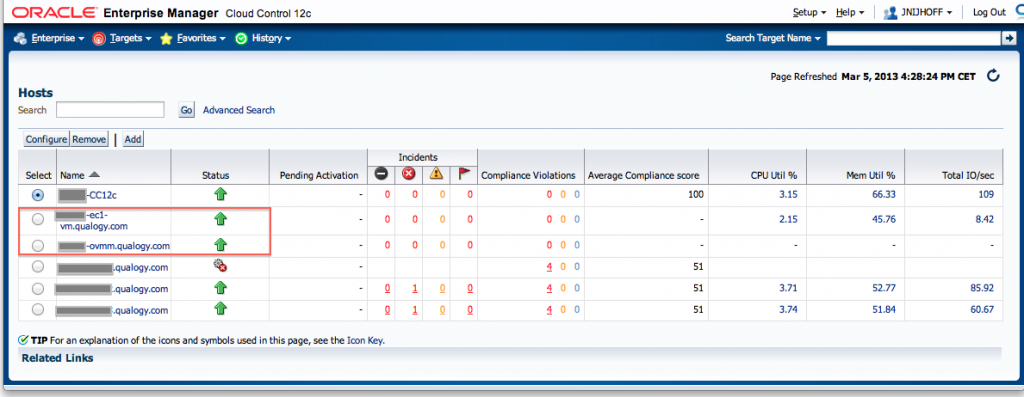
And here we see the result of our efforts so far:
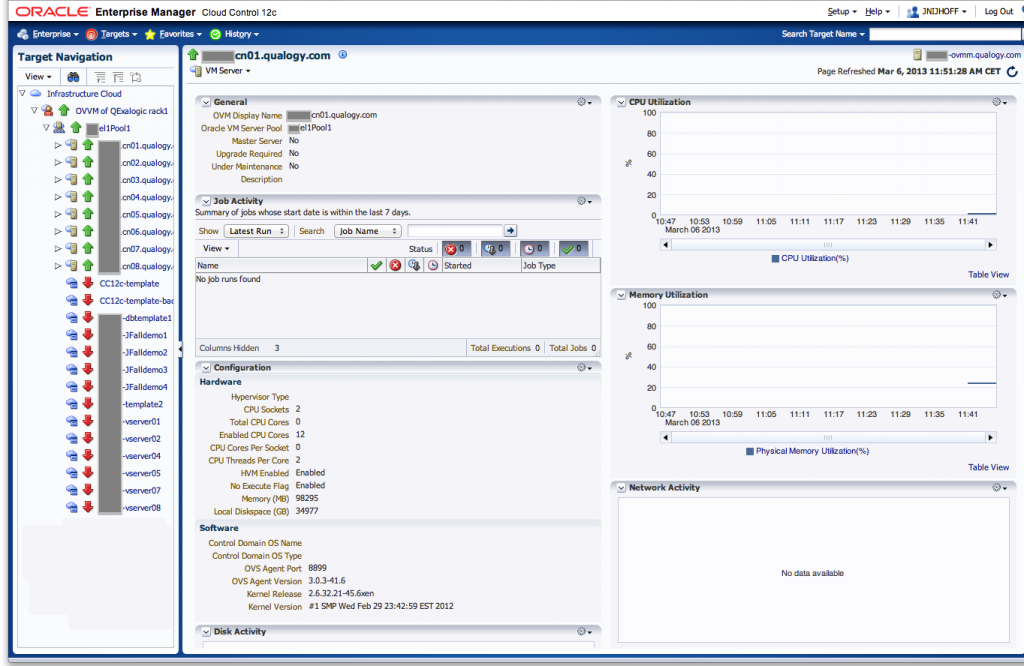
We can now see some parts of our Exalogic virtual datacenter. We can see the eight hypervisor nodes cn01-cn08 and expand them to see what runs on each. We also see the unallocated vServers that are not running presently.
In the next post I will finish up with step 7 (Discover the Exalogic system using Exalogic Elastic Cloud Discovery Wizard) and show you more examples of what you can now see and monitor on the Exalogic from Cloud Control.
Publicatiedatum: 3 april 2013


