Patching Oracle Exalogic - Updating Linux on the compute - Part 2

Patching Oracle Exalogic - Updating Linux on the compute - Part 2

Gepubliceerd: Categorie: Oracle

Patching Exalogic part 4b

In the previous post we started on patching the Exalogic compute servers, and we applied the patch procedure to one of them (node 8), taking patchset 2.0.0.0.1 as an example.   

The idea is to demonstrate that patching of the compute nodes can be done in a rolling fashion, maintaining application availability during the upgrade, provided that your application is deployed in redundant (HA) fashion, for example in a Weblogic cluster spread over more that one physical node. There can be four (1/8th rack) to 30 (full rack) compute nodes in an Exalogic rack.   

In this post we will check if all went OK, finish the patching procedure for node 8 and complete the rolling upgrade procedure for all our other Exalogic compute nodes. This will also be the last post in our Exalogic patching series for physical setups, as we have shifted to a virtualized stack.   

Let’s log back into our already updated node 8 and see if all went well. First we check the logfile /opt/baseimage_patch/scripts/ebi_20001.log. No obvious problems there, OK.   

Now check the status of our Infiniband connections:

  1. [root@xxxxexa08 ~]# <strong>ibstatus
  2. </strong>Infiniband device 'mlx4_0' port 1 status:
  3. default gid:     fe80:0000:0000:0000:0021:2800:01ce:b297
  4. base lid:        0xa
  5. sm lid:          0xc
  6. state:           <strong>4: ACTIVE</strong>
  7. phys state:      <strong>5: LinkUp</strong>
  8. rate:            40 Gb/sec (4X QDR)
  9. link_layer:      IB
  10.  
  11. Infiniband device 'mlx4_0' port 2 status:
  12. default gid:     fe80:0000:0000:0000:0021:2800:01ce:b298
  13. base lid:        0xb
  14. sm lid:          0xc
  15. state:          <strong> 4: ACTIVE</strong>
  16. phys state:      <strong>5: LinkUp</strong>
  17. rate:            40 Gb/sec (4X QDR)
  18. link_layer:      IB
  1. [root@xxxxexa08 ~]# <strong>ifconfig ib0
  2. </strong><strong>ib0       Link encap:InfiniBand  HWaddr 80:00:00:4A:FE:80:00:00:00:00:00:
  3. 00:00:00:00:00:00:00:00:00
  4. </strong><strong> UP BROADCAST RUNNING SLAVE MULTICAST  MTU:65520  Metric:1
  5. </strong>RX packets:46370 errors:0 dropped:0 overruns:0 frame:0
  6. TX packets:46694 errors:0 dropped:9 overruns:0 carrier:0
  7. collisions:0 txqueuelen:256
  8. RX bytes:236416542 (225.4 MiB)  TX bytes:9428574 (8.9 MiB)
  1. .
  1. [root@xxxxexa08 ~]# <strong>ifconfig ib1
  2. </strong><strong>ib1       Link encap:InfiniBand  HWaddr 80:00:00:4B:FE:80:00:00:00:00:00:
  3. 00:00:00:00:00:00:00:00:00
  4. </strong><strong> UP BROADCAST RUNNING SLAVE MULTICAST  MTU:65520  Metric:1
  5. </strong>RX packets:13 errors:0 dropped:0 overruns:0 frame:0
  6. TX packets:0 errors:0 dropped:0 overruns:0 carrier:0
  7. collisions:0 txqueuelen:256
  8. RX bytes:728 (728.0 b)  TX bytes:0 (0.0 b)

Our infinband interfaces are running fine. Now we check the new version of our compute node base image:
 

  1. root@xxxxexa08 general]# <strong>imageinfo
  2. </strong>Exalogic 2.0.0.0.1 (build:r213841)
  3. <strong>Image version       : 2.0.0.0.1
  4. </strong>Image build version : 213841
  5. Creation timestamp  : 2012-07-04 13:56:06 +0200
  6. Kernel version      : 2.6.32-200.21.2.el5uek
  7. Image activated     : 2012-03-22 10:18:02 +0100
  8. Image status        : SUCCESS

Looking good, let’s check our update history as well:

  1. [root@xxxxexa08 general]# <strong>imagehistory
  2. </strong>Image version       : 2.0.0.0.1
  3. Patch number        : 13569004
  4. Patch timestamp     : 2012-07-04 13:56:06 +0200
  5. Image mode          : patch
  6. Patch status        : SUCCESS
  7. Image version       : 2.0.0.0.0
  8. Image build version : 213841
  9. Upgrade timestamp   : 2012-03-22 10:18:02 +0100
  10. Image mode          : upgrade
  11. Upgrade status      : SUCCESS
  12. Image version       : 1.0.0.2.2
  13. Patch number        : 13113092
  14. Patch timestamp     : 2012-02-14 11:30:36 +0100
  15. Image mode          : patch
  16. Patch status        : SUCCESS
  17. Image version       : 1.0.0.2.0
  18. Image build version : 208125
  19. Patch timestamp     : 2011-10-18 01:36:08 +0200
  20. Image mode          : patch
  21. Patch status        : SUCCESS
  22. Image version       : 1.0.0.1.0
  23. Image build version : 201524
  24. Creation timestamp  : 2011-01-07 16:16:00 -0800
  25. Image activated     : 2011-06-20 02:14:54 -0400
  26. Image mode          : fresh
  27. Image status        : SUCCESS

Nice, you can see all the updates we did from the day our Exalogic was rolled into the datacenter… Check the kernel version:

  1. [root@xxxxexa08 general]# <strong>uname -r
  2. </strong>2.6.32-200.21.<strong>2</strong>.el5uek

Compare this to an as yet unpatched 2.0.0.0.0 node : 

  1. [root@xxxxexa01 ~]# <strong>uname -r</strong>
  2. 2.6.32-200.21.<strong>1</strong>.el5uek

Good, it looks like all went well for node 8.

Post Patching

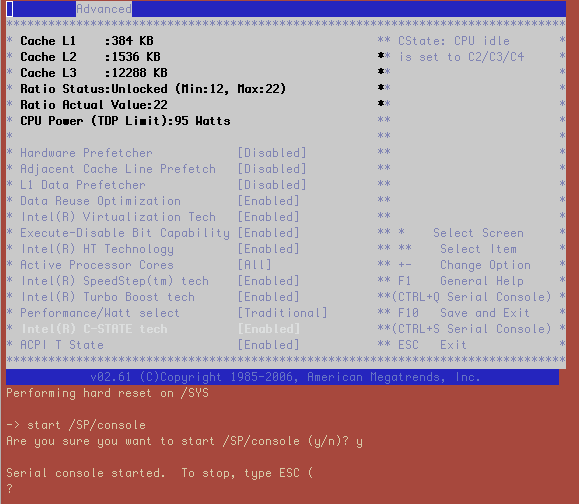
There is also some post patching work to do: we need to make some changes in the BIOS. In particular, enabling SR-IOV is of note, as this will prepare us for introducing virtualization to the Exalogic stack later on.
 
A few BIOS parameters need to be reconfigured following application of the patch. The following are the required changes:   

  • Intel(R) C-STATE tech must be enabled for the CPU
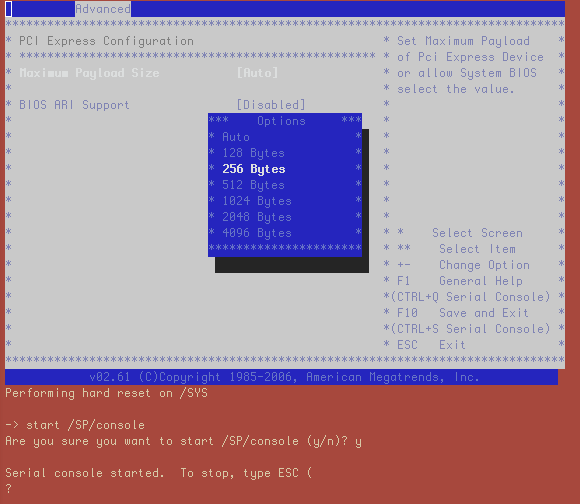
  • Maximum Payload Size for PCI Express needs to be changed to 256 Bytes
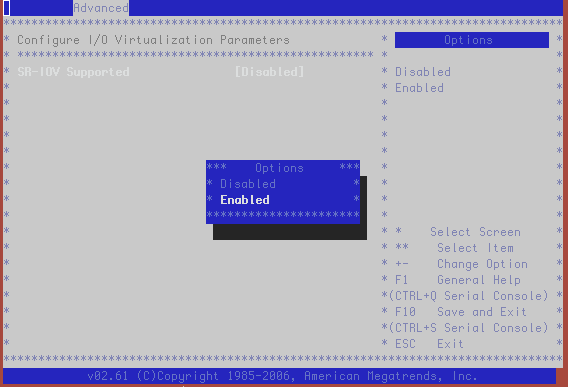
  • SR-IOV Support should be enabled

We need to logon to the Lights Out Manager of node 8 so we can make the server boot into BIOS and make the changes. 

  1. JNs-MBP3-QA-2:~ jnwerk$ <strong>ssh root@xxxexacn08-c.qualogy.com
  2. </strong>Password:
  3. Password:
  4.  
  5. Oracle(R) Integrated Lights Out Manager
  6.  
  7. Version 3.0.16.10.a r68533
  8.  
  9. Copyright (c) 2011, Oracle and/or its affiliates. All rights reserved.
  10.  
  11. -&gt; <strong>cd /HOST
  12. </strong>/HOST
  13.  
  14. -&gt; <strong>set boot_device=bios
  15. </strong>Set 'boot_device' to 'bios'
  16.  
  17. -&gt; <strong>start /SYS
  18. </strong>Are you sure you want to start /SYS (y/n)? <strong>y
  19. </strong>start: Target already started
  20.  
  21. -&gt; <strong>reset /SYS
  22. </strong>Are you sure you want to reset /SYS (y/n)? <strong>y
  23. </strong>Performing hard reset on /SYS
  24.  
  25. -&gt; <strong>start /SP/console
  26. </strong>Are you sure you want to start /SP/console (y/n)? <strong>y
  27. </strong> 
  28. Serial console started.  To stop, type ESC (

As we have started a console session from the ILOM we see the server boot into BIOS and we can then go through the BIOS menus and make the required changes as demonstrated in the screenshots below:  

This wraps up our patch procedure for our first node. Now we can look at the other seven nodes in our quarter rack system.   

Rolling upgrade of application cluster nodes

After some days to test the waters and assure there are no unexpected issues with node 8 after upgrading it, we decide to go ahead and finish the upgrade. 
 
We decide to do a rolling upgrade on our Weblogic HA cluster which is running on nodes 1 and 2 and also on a Business Process Management HA deployment on nodes 3 and 4. So I had to upgrade nodes 2 and 4 in parallel, leaving the aforementioned applications running on nodes 1 and 3. When upgraded succesfully, we could then do a failover of the applications and upgrade nodes 1 and 3 in turn, assuring continued availability of these critical applications during the whole upgrade process. 
 
Patching multiple nodes at the same time can be achieved by using the setup_dcli.sh and run_dcli.sh scripts. Quoting from the patch documentation :  

  1. <em>Patching Multiple Nodes in Parallel:
  2. </em><em>A tool called dcli (distributed command line interface) is included in Exalogic compute nodes which
  3. enables you to run a given command on multiple compute nodes in parallel.
  4. </em><em>As already mentioned, patching multiple nodes in parallel results in faster patching, but requires
  5. downtime of nodes being patched.</em>

We run the patching from our newly upgraded node 8. First we check that password-less login has been configured for all nodes. If not, now is the time to set this up (described in the README). We check for password-less login by using the dcli command. As an example we check the baseimage and build version on all nodes. 

[root@xxxxexacn08 josn]# <strong>dcli -t -g allnodes-priv.lst cat /usr/lib/init-exalogic-node/.image_id | grep exalogic_version
</strong>xxxxexacn01-priv: exalogic_version='2.0.0.0.0'
xxxxexacn02-priv: exalogic_version='2.0.0.0.0'
xxxxexacn03-priv: exalogic_version='2.0.0.0.0'
xxxxexacn04-priv: exalogic_version='2.0.0.0.0'
xxxxexacn05-priv: exalogic_version='2.0.0.0.0'
xxxxexacn06-priv: exalogic_version='2.0.0.0.0'
xxxxexacn07-priv: exalogic_version='2.0.0.0.0'
xxxxexacn08-priv: exalogic_version='2.0.0.0.1'

If password-less login had not been setup the dcli tool would have asked for the passwords of nodes 1-7. If you have already set this up before (as we have here), this step can be skipped. However, for demonstrational purposes we will execute the pasword-less setup anyway:

  1. <em>[root@xxxxexacn08 ~]#<strong> cd /u01/common/patches/todo/13569004/Infrastructure/2.0.0.0.1/BaseImage/2.0.0.0.1/scripts
  2. </strong></em>[root@xxxxexacn08 scripts]# <strong>vi machine_list
  3. </strong> 
  4. #This file contains a list of hostnames to be patched in parallel through dcli.
  5. #Comment out hostnames to exclude from list
  6.  
  7. #Hostnames start here ###
  8. xxxxexacn01-priv
  9. xxxxexacn02-priv
  10. xxxxexacn03-priv
  11. xxxxexacn04-priv
  12. xxxxexacn05-priv
  13. xxxxexacn06-priv
  14. xxxxexacn07-priv
  15. #xxxxexacn08-priv

Compute node 8 has been striked out as it does not need to setup equivalency with itself.  

[root@xxxxexacn08 scripts]# <strong>dcli -t -g machine_list -k -s "\-o StrictHostKeyChecking=no"
</strong>Target nodes: ['xxxxexacn02-priv’, 'xxxxexacn03-priv’, 'xxxxexacn04-priv’,
'xxxxexacn05-priv’, 'xxxxexacn06-priv’, 'xxxxexacn07-priv’]
root@xxxxexacn01-priv’s password:
root@xxxxexacn03-priv’s password:
root@xxxxexacn04-priv’s password:
root@xxxxexacn06-priv’s password:
root@xxxxexacn05-priv’s password:
root@xxxxexacn07-priv’s password:
root@xxxxexacn02-priv’s password:
xxxxexacn01-priv:ssh key added
xxxxexacn02-priv:ssh key added
xxxxexacn03-priv:ssh key added
xxxxexacn04-priv:ssh key added
xxxxexacn05-priv:ssh key added
xxxxexacn06-priv:ssh key added
xxxxexacn07-priv:ssh key added

Next we have to configure some properties in the USER section of the dcli.properties file. Change the values of the following to suit your environment: PATCH_DOWNLOAD_LOCATION and LOCAL_BASE_IMAGE_LOC.

  1. #dcli.properties
  2. ############ USER SECTION START ###############################
  3. #Property file for ebi_patch.sh
  4. #Provide unzipped exalogic patch location
  5. #Example   PATCH_DOWNLOAD_LOCATION=/patches/&lt;patch_number&gt;
  6. #Location of Patch Set Update files (unzipped) on NFS share
  7. <strong><strong>PATCH_DOWNLOAD_LOCATION=<strong>/u01/common/patches/todo/</strong></strong></strong><em><strong>13569004
  8. </strong></em>#Local node location where base image patches should be copied
  9. <strong>LOCAL_BASE_IMAGE_LOC=</strong>/opt/baseimage_patch
  10. #Location of Base image patches on NFS share. No need to change this value
  11. unless you have changed the directory structure in the downloaded PSU.
  12. STORAGE_BASE_IMAGE_LOC=${PATCH_DOWNLOAD_LOCATION}/Infrastructure/2.0.0.0.1/BaseImage/2.0.0.0.1
  13. ############ USER SECTION END #################################

No need to cleanup the LOCAL_BASE_IMAGE_LOC directories on the nodes in question from any previous activities before starting your patch run, as the setup script will do this for you. Now strike out the nodes in our machine_list file that we don’t want to patch (yet), leaving nodes 2 and 4 to be patched:

  1. [root@xxxxexacn08 scripts]# <strong>vi machine_list</strong>
  2.  
  3. #This file contains a list of hostnames to be patched in parallel through dcli.
  4. #Comment out hostnames to exclude from list
  5.  
  6. #Hostnames start here ###
  7. #xxxxexacn01-priv
  8. xxxxexacn02-priv
  9. #xxxxexacn03-priv
  10. xxxxexacn04-priv
  11. #xxxxexacn05-priv
  12. #xxxxexacn06-priv
  13. #xxxxexacn07-priv
  14. #xxxxexacn08-priv

The next step is to run the setup_dcli.sh script: 

  1. [root@xxxxexacn08 scripts]# <strong>./setup_dcli.sh</strong>

This will copy the necessary files to the local directories /opt/baseimage_patch on nodes 2 and 4. If the script reports issues, investigate and fix them.   

Application failover

If not done already, now is the time to shutdown the application processes on nodes 2 and 4, so the user sessions will failover to nodes 1 and 3 and we are free to run the upgrade. Check if there are no leftover application user processes that could hamper unmounting of filesystems and rebooting.

Executing the parallel patching process

Before setting the actual upgrade process in motion, ensure that all Enterprise Manager agents are stopped and NFS mounted file systems are unmounted on all nodes being patched in parallel. The patch script will try to unmount NFS shares and will exit if any unmount command fails. In addition, to save some downtime, consider to temporarely “hash out” the NFS mountpoints in /etc/fstab  (but to be safe, do not remove the /u01/common/patches mountpoint!)   

  1. [root@xxxxexacn08 josn]# <strong>dcli -t -g machgine -x stop_oemagents.scl
  2. </strong>Target nodes: ['xxxxexacn02-priv’, 'xxxxexacn04-priv’]
  3. xxxxexacn02: Oracle Enterprise Manager 12c Cloud Control 12.1.0.1.0
  4. xxxxexacn02: Copyright (c) 1996, 2011 Oracle Corporation.  All rights reserved.
  5. xxxxexacn02: Stopping agent ........ stopped.
  6. xxxxexacn04: Oracle Enterprise Manager 12c Cloud Control 12.1.0.1.0
  7. xxxxexacn04: Copyright (c) 1996, 2011 Oracle Corporation.  All rights reserved.
  8. xxxxexacn04: Stopping agent ........ stopped.
  1. [root@xxxxexacn08 scripts]# <strong>dcli -t -g machine_list umount -a -t nfs
  2. </strong><em>&lt;no output, all NFS filesystems unmounted OK&gt;</em>

Now setup a console sessions to each node via the ILOM, so you can see all that goes on once patching has started. This example is for node 2:  

  1. JNs-MBP3-QA-2:~ jnwerk$ <strong>ssh root@xxxexacn02-c.qualogy.com</strong>
  2. Password:
  3.  
  4. Oracle(R) Integrated Lights Out Manager
  5.  
  6. Version 3.0.16.10.a r68533
  7.  
  8. Copyright (c) 2011, Oracle and/or its affiliates. All rights reserved.
  9.  
  10. -&gt; start /SP/console
  11. Are you sure you want to start /SP/console (y/n)? y
  12.  
  13. Serial console started.  To stop, type ESC (

Finally, we can kick off the parallel upgrade process for nodes 2 and 4 with the run _dcli.sh script:

  1. [root@xxxxexacn08 scripts]# <strong>./run_dcli.sh</strong>

This will execute the patch process on the two nodes, analogous to what we have done before on node 8, but now in parallel. Monitor the patching process via the two console session we opened via the ILOMs. The nodes will be rebooted multiple times. Finally, perform the BIOS changes (“Post Patching steps”) for both nodes using the two ILOM session already opened to watch the proceedings.   

After doing this, check the patch logfile and image versions on nodes 2 and 4 and restart the agents if they are not configured to startup automatically (which could slow down patching, hence I turned it off beforehand). The .scl scripts are simple scripts to perform the desired actions.

  1. [root@xxxxexacn08 josn]# <strong>dcli -t -g nodes1-7.lst -x start_oemagents.scl 
  2. </strong>Target nodes: ['xxxxexacn02-priv’, 'xxxxexacn04-priv’]
  3. xxxxexacn02-priv: Oracle Enterprise Manager 12c Cloud Control 12.1.0.1.0
  4. xxxxexacn02-priv: Copyright (c) 1996, 2011 Oracle Corporation.  All rights reserved.
  5. xxxxexacn02-priv: Starting agent ........ started.
  6. xxxxexacn04-priv: Oracle Enterprise Manager 12c Cloud Control 12.1.0.1.0
  7. xxxxexacn04-priv: Copyright (c) 1996, 2011 Oracle Corporation.  All rights reserved.
  8. xxxxexacn04-priv: Starting agent ........ started.
  9.  
  10. [root@xxxxexacn08 josn]# <strong>dcli -t -g allnodes.lst -x check_oemagents.scl | grep Running
  11. </strong>Target nodes: ['xxxxexacn02-priv’, 'xxxxexacn04-priv’]
  12. xxxxexacn02-priv: Agent is Running and Ready
  13. xxxxexacn04-priv: Agent is Running and Ready

Now that our nodes 2 and 4 have been upgraded succesfully, we can restart the application processes on these nodes. Then we can do our application failovers to them, and repeat the same patching procedure for nodes 1 and 3. Thus, we have patched all four compute nodes while maintaing application availablity. The other nodes 5, 6 and 7 can be upgraded similarly by modifying the machine_list file, depending if they may be patched in one go or not.   

CONCLUSION

This concludes my series on the patching procedures for physical Exalogic configurations. We started with the Infiniband switches, then we did the ZFS 7320 storage and finished with the X4170-M2 compute servers. Throughout the upgrades, I have demonstrated that they can each be executed in a rolling fashion, provided you have setup high availability for your applications.

Publicatiedatum: 19 maart 2013

Jos Nijhoff
Over auteur Jos Nijhoff

Jos Nijhoff is an experienced Application Infrastructure consultant at Qualogy. Currently he plays a key role as technical presales and hands-on implementation lead for Qualogy's exclusive Exalogic partnership with Oracle for the Benelux area. Thus he keeps in close contact with Oracle presales and partner services on new developments, but maintains an independent view. He gives technical guidance and designs, reviews, manages and updates the application infrastructure before, during and after the rollout of new and existing Oracle (Fusion) Applications & Fusion Middleware implementations. Jos is also familiar with subjects like high availability, disaster recovery scenarios, virtualization, performance analysis, data security, and identity management integration with respect to Oracle applications.

Meer posts van Jos Nijhoff
Reacties
Reactie plaatsen