Patching Oracle Exalogic - Updating the ZFS 7320 Storage Appliance II

Patching Oracle Exalogic - Updating the ZFS 7320 Storage Appliance II

Gepubliceerd: Categorie: Oracle

Part 3b

In my previous post we checked the current software versions on the storage, started the rolling upgrade proces for the ZFS 7320 storage appliance and upgraded the ILOM of storage head2. Now we will finish what we started by performing step 3, upgrading the storage software to version 2011.1.1.0, which is needed for Exalogic versions 1.0.0.0.5 and 2.0.0.0.0.

1.6 Upgrading storage head 2 continued

Let’s see where we were in the upgrade guide, section 2.4.3:

  • Step 3 : Upgrading ZFS Storage 7320 Software to version 2011.1.1.0.

This section describes how to upgrade the ZFS Storage 7320 software to version 2011.1.1.0 (2011.04.24.1.0,1-1.8). Ensure that the storage head is running version 2010.Q3.2.1 (2010.08.17.2.1,1-1.21) or higher before proceeding with upgrade to 2011.1.1.0. Also, Ensure that the ILOM is upgraded, and ILOM/BIOS is running the version 3.0.16.10, build r65138, before applying this software update.  

To upgrade the ZFS storage 7320 software to version 2011.1.1.0, complete the following steps:  

1. Log in to ILOM of the storage head where you updated the ILOM, as root:

  1. % <strong>ssh root@xxxxsn2-c.qualogy.com
  2. </strong>Password:
  3. Oracle(R) Integrated Lights Out Manager
  4. Version 3.0.16.10 r65138
  5. Copyright (c) 2011, Oracle and/or its affiliates. All rights reserved.
  6. -&gt; <strong>start /SP/console
  7. </strong>Are you sure you want to start /SP/console (y/n)? y
  8. Serial console started.  To stop, type ESC (
  9. ...
  10. ...

2. Check if this storage head has network connectivity.

  1. xxxxsn2:configuration cluster resources&gt; <strong>ping xxxxsn1.qualogy.com
  2. </strong>xxxxsn1.qualogy.com is alive

3. Run the following command:

  1. xxxxsn2:configuration cluster resources&gt; <strong>cd /
  2. </strong>xxxxsn2:&gt; <strong>maintenance system updates download
  3. </strong>xxxxsn2:maintenance system updates download (uncommitted)&gt;

Ensure that you have created the patches share on the Sun ZFS Storage 7320 appliance, and enabled the FTP service on the share with the permission for root access. Configure to download the new software from <ftp URL to ak-nas-2011-04-24-1-0-1-1-8-nd.pkg.gz> by using the set url, set user, and set passwordcommands as follows:

  1. <strong>set url=</strong><strong>ftp://&lt;storage VIP address&gt;//export/common/patches/todo/13795376/Infrastructure/2.0.0.0.0/ZFS_Storage_7320/Software/2011.1.1.0/ak-nas-2011-04-24-1-0-1-1-8-nd.pkg.gz
  2. </strong>url = ftp://192.168.xx.yy//export/common/patches/todo/13795376/Infrastructure/2.0.0.0.0/ZFS_Storage_7320/Software/2011.1.1.0/ak-nas-2011-04-24-1-0-1-1-8-nd.pkg.gz
  3. xxxxsn2:maintenance system updates download (uncommitted)&gt; <strong>set user=patcher
  4. </strong>user = patcher
  5. xxxxsn2:maintenance system updates download (uncommitted)&gt; <strong>set password
  6. </strong>Enter password:
  7. password = **********
  8. Now we have to actually start the download of the new package :
  9. xxxxsn2:maintenance system updates download (uncommitted)&gt; <strong>commit
  10. </strong>Transferred 681M of 703M (96.9%) ... done
  11. Unpacking ... done
  12. Check the list of past and present updates :
  13. xxxxsn2:maintenance&gt; <strong>system updates
  14. </strong>xxxxsn2:maintenance system updates&gt; <strong>show
  15. </strong>Updates:
  16. UPDATE                           DATE                      STATUS
  17. ak-nas@2010.08.17.1.1,1-1.16     2010-11-1 12:46:16        previous
  18. ak-nas@2010.08.17.2.1,1-1.21     2011-3-10 23:49:47        previous
  19. <strong>ak-nas@2010.08.17.3.0,1-1.25     2011-4-29 15:48:52        current
  20. </strong><strong>ak-nas@2011.04.24.1.0,1-1.8      2011-12-21 22:32:50       waiting</strong>
  21. Deferred updates:
  22. The appliance is currently configured as part of a cluster. The cluster peer
  23. may have shared resources for which deferred updates are available. After all
  24. updates are completed, check both cluster peers for any deferred updates.

Then select the newly downloaded version and start the upgrade:

  1. xxxxsn2:maintenance system updates&gt; <strong>select ak-nas@2011.04.24.1.0,1-1.8
  2. </strong>xxxxsn2:maintenance system updates ak-nas@2011.04.24.1.0,1-1.8&gt; <strong>upgrade
  3. </strong>The selected software update requires a system reboot in order to take effect.
  4. The system will automatically reboot at the end of the update process. The
  5. update will take several minutes. At any time during this process, you can
  6. cancel the update with [Control-C].
  7. Are you sure? (Y/N) <strong>Y
  8. </strong>Updating from ... ak/nas@2010.08.17.3.0,1-1.25
  9. Loading media metadata ... done.
  10. Selecting alternate product ... SUNW,maguro_plus
  11. Installing Sun ZFS Storage 7320 2011.04.24.1.0,1-1.8
  12. pkg://sun.com/ak/SUNW,maguro_plus@2011.04.24.1.0,1-1.8:20111221T223250Z
  13. Creating system/ak-nas-2011.04.24.1.0_1-1.8 ... done.
  14. Creating system/ak-nas-2011.04.24.1.0_1-1.8/install ... done.
  15. Creating system/ak-nas-2011.04.24.1.0_1-1.8/boot ... done.
  16. Creating system/ak-nas-2011.04.24.1.0_1-1.8/root ... done.
  17. Creating system/ak-nas-2011.04.24.1.0_1-1.8/install/svc ... done.
  18. Creating system/ak-nas-2011.04.24.1.0_1-1.8/install/var ... done.
  19. Creating system/ak-nas-2011.04.24.1.0_1-1.8/install/home ... done.
  20. Creating system/ak-nas-2011.04.24.1.0_1-1.8/install/stash ... done.
  21. Creating system/ak-nas-2011.04.24.1.0_1-1.8/wiki ... done.
  22. Customizing Solaris ... done.
  23. Updating vfstab ... done.
  24. Generating usr/man windex ... done.
  25. Generating usr/sfw/man windex ... done.
  26. Preserving ssh keys ... done.
  27. ...
  28. ...
  29. Installing firmware ... done.
  30. Installing device links ... Installing device files ... Updating device links ... done.
  31. Updating /etc ... done.
  32. Building boot menu ... done.
  33. Installing boot unix ... done.
  34. Installing boot amd64/unix ... done.
  35. Installing boot menu ... done.
  36. Snapshotting zfs filesystems ...  done.
  37. Installing grub on /dev/rdsk/c2t1d0s0 ... done.
  38. Installing grub on /dev/rdsk/c2t0d0s0 ... done.
  39. Update completed; rebooting.
  40. xxxxsn2 console login: rootsyncing file systems... done
  41. rebooting...
  42. SunOS Release 5.11 Version ak/generic@2011.04.24.1.0,1-1.8 64-bit
  43. Copyright (c) 1983, 2010, Oracle and/or its affiliates. All rights reserved.
  44. System update in progress.
  45. Updating from: ak/nas@2010.08.17.3.0,1-1.25
  46. Updating to:   ak/nas@2011.04.24.1.0,1-1.8
  47. Cloning active datasets ...... done.
  48. Upgrading /var/ak/home ... 16 blocks
  49. Upgrading /etc/svc/profile ... 176 blocks
  50. Upgrading /var/apache2 ... 4416 blocks
  51. Upgrading /var/sadm ... 6240 blocks
  52. Upgrading /var/svc ... 64 blocks
  53. Upgrading /var/dhcp/duid ... done.
  54. Upgrading /var/crypto/pkcs11.conf ... done.
  55. Updating system logs ... done.
  56. Starting configd ... done.
  57. Scanning manifests ... done.
  58. ...
  59. ...
  60. Refreshing system/identity:node ... done.
  61. Refreshing system/name-service-cache:default ... done.
  62. Refreshing system/ndmpd:default ... done.
  63. Applying service layer ak_nas ... done.
  64. Applying service layer ak_SUNW,maguro_plus ... done.
  65. Refreshing appliance/kit/identity:default ... done.
  66. Applying service profile generic ... done.
  67. Applying profile upgrade/akinstall.xml ... done.
  68. Applying layer upgrade/composite.svc ... done.
  69. Cleaning up services ... done.
  70. Shutting down configd ... done.
  71. Configuring devices.
  72. Configuring network devices ... done.
  73. Sun ZFS Storage 7320 Version ak/SUNW,maguro_plus@2011.04.24.1.0,1-1.8
  74. Copyright 2012 Oracle  All rights reserved.
  75. Use is subject to license terms.

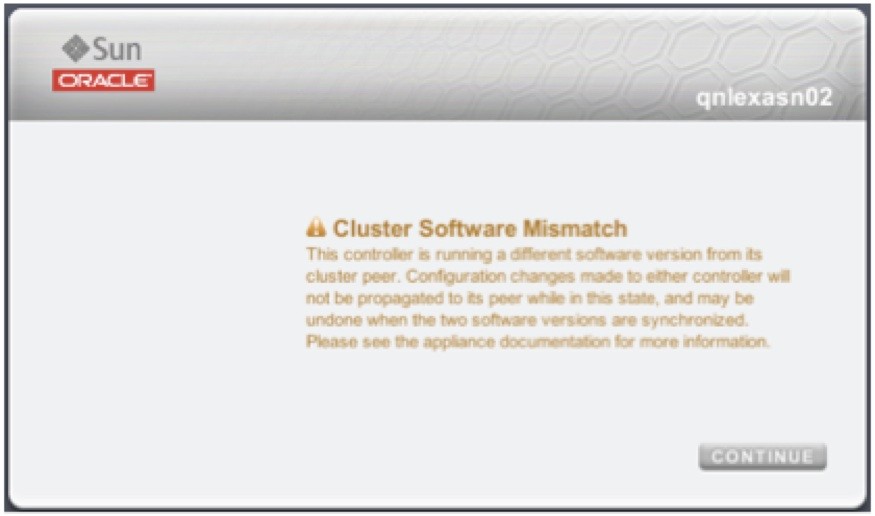
OK, we have now upgraded the storage software on storage head2. Now log back onto it’s CLI console. We see a warning that the machine is running two different software versions now (as we have not upgraded the active head 1 yet).

  1. -&gt; <strong>start /SP/console
  2. </strong>Are you sure you want to start /SP/console (y/n)? y
  3. Serial console started.  To stop, type ESC (
  4. xxxxsn2 console login: <strong>root
  5. </strong>Password:
  6. Last login: Tue Mar 20 13:34:45 on console
  7. <span style="text-decoration: underline">This controller is running a different software version from its cluster
  8. </span><span style="text-decoration: underline">peer.</span> Configuration changes made to either controller will not be propagated
  9. to its peer while in this state, and may be undone when the two software
  10. versions are synchronized. Please see the appliance documentation for more
  11. information.

This message is also shown when logging in to the storage webinterfaces (figure 3), as a reminder that we should not leave it at this:

Check the current version:

  1. xxxxsn2:&gt; <strong>maintenance system updates
  2. </strong>xxxxsn2:maintenance system updates&gt; <strong>show
  3. </strong>Updates:
  4. UPDATE                           DATE                      STATUS
  5. ak-nas@2010.08.17.1.1,1-1.16     2010-11-1 12:46:16        previous
  6. ak-nas@2010.08.17.2.1,1-1.21     2011-3-10 23:49:47        previous
  7. ak-nas@2010.08.17.3.0,1-1.25     2011-4-29 15:48:52        previous
  8. <strong>ak-nas@2011.04.24.1.0,1-1.8      2011-12-21 22:32:50       current</strong>
  9. Deferred updates:
  10. The appliance is currently configured as part of a cluster. The cluster peer
  11. may have shared resources for which deferred updates are available. After all
  12. updates are completed, check both cluster peers for any deferred updates.

OK, storage head 2 is ready and we should now do a switchover to free head 1 from active duty and upgrade it next.

1.7 Doing the switchover between heads 1 and 2

The document says only this:

Now you can perform a takeover operation, as required, depending on your choice of storage head to serve as the active storage head. Ensure that one of the storage heads is in the Active (takeover completed) state, and the other is in the Ready (waiting for failback) state. This process completes software upgrade on the ZFS storage appliance.

OK, but how can we perform the takeover from 1 to 2? The takeover can be done via the webGUI, which I will demonstrate in a future post. Here’s how to do it from the CLI:

  1. xxxxsn2:maintenance system updates&gt; <strong>cd /
  2. </strong>xxxxsn2:&gt; configuration cluster
  3. xxxxsn2:configuration cluster&gt; <strong>show
  4. </strong>Properties:
  5. state = AKCS_STRIPPED
  6. <strong> description = Ready (waiting for failback)
  7. </strong>peer_asn = a54b53a0-afba-eae1-a77a-b0013813b629
  8. peer_hostname = xxxxsn1
  9. peer_state = AKCS_OWNER
  10. peer_description = Active (takeover completed)
  11. Children:
  12. resources =&gt; Configure resources
  13. xxxxsn2:configuration cluster&gt; <strong>help
  14. </strong>Subcommands that are valid in this context:
  15. resources            =&gt; Configure resources
  16. help [topic]         =&gt; Get context-sensitive help. If [topic] is specified,
  17. it must be one of "builtins", "commands", "general",
  18. "help", "script" or "properties".
  19. show                 =&gt; Show information pertinent to the current context
  20. done                 =&gt; Finish operating on "cluster"
  21. get [prop]           =&gt; Get value for property [prop]. ("help properties"
  22. for valid properties.) If [prop] is not specified,
  23. returns values for all properties.
  24. setup                =&gt; Run through initial cluster setup
  25. failback             =&gt; Fail back all resources assigned to the cluster peer
  26. takeover             =&gt; Take over all resources assigned to the cluster peer
  27. links                =&gt; Report the state of the cluster links
  28.  
  29. xxxxsn2:configuration cluster&gt; <strong>takeover
  30. </strong>Continuing will immediately take over the resources assigned to the cluster
  31. peer. This may result in clients experiencing a slight delay in service.
  32. Are you sure? (Y/N)
  33. xxxxsn2:configuration cluster&gt;
  34. xxxxsn2:configuration cluster&gt; <strong>show
  35. </strong>Properties:
  36. state = AKCS_OWNER
  37. description = Active (takeover completed)
  38. peer_asn = a54b53a0-afba-eae1-a77a-b0013813b629
  39. peer_hostname = xxxxsn1
  40. <strong> peer_state =
  41. </strong>peer_description = Unknown (disconnected or restarting)
  42. Children:
  43. resources =&gt; Configure resources

Now the storage head 1 will restart and join the cluster again, now as the active backup. After waiting a little (30 sec or so), check status again:

  1. xxxxsn<strong>2</strong>:configuration cluster&gt; <strong>show
  2. </strong>Properties:
  3. state = AKCS_OWNER
  4. description = Active (takeover completed)
  5. peer_asn = a54b53a0-afba-eae1-a77a-b0013813b629
  6. <strong> peer_hostname = xxxxsn1
  7. </strong>peer_state = AKCS_STRIPPED
  8. peer_description = Ready (waiting for failback)
  9. Children:
  10. resources =&gt; Configure resources

Now check the status on head 1 as well :

  1. xxxxsn<strong>1</strong>:configuration cluster&gt; <strong>show
  2. </strong>Properties:
  3. state = AKCS_STRIPPED
  4. <strong> description = Ready (waiting for failback)
  5. </strong>peer_asn = 9faf8ff1-c3a8-c090-8f4e-9871618a152e
  6. peer_hostname = xxxxsn2
  7. peer_state = AKCS_OWNER
  8. peer_description = Active (takeover completed)
  9. Children:
  10. resources =&gt; Configure resources

Now that we have done the takeover we can perform the same upgrade steps 2 and 3 on head 1 as well, first the ILOM upgrade (see previous post) and then the storage upgrade. As it’s the same routine as before, thus I will not show it here.

1.8 Conclusion

We have demonstrated that we can upgrade both the network and the storage infrastructure in our Exalogic quarter rack in a rolling fashion, without interrupting these services and maintaining  availability!

1.9 Next time

In a following post, we move on the next part of patching the Exalogic infrastructure: upgrading the OS image on the compute nodes.

Publicatiedatum: 29 augustus 2012

Jos Nijhoff
Over auteur Jos Nijhoff

Jos Nijhoff is an experienced Application Infrastructure consultant at Qualogy. Currently he plays a key role as technical presales and hands-on implementation lead for Qualogy's exclusive Exalogic partnership with Oracle for the Benelux area. Thus he keeps in close contact with Oracle presales and partner services on new developments, but maintains an independent view. He gives technical guidance and designs, reviews, manages and updates the application infrastructure before, during and after the rollout of new and existing Oracle (Fusion) Applications & Fusion Middleware implementations. Jos is also familiar with subjects like high availability, disaster recovery scenarios, virtualization, performance analysis, data security, and identity management integration with respect to Oracle applications.

Meer posts van Jos Nijhoff
Reacties
Reactie plaatsen